The Happy Family Plan

As you may know, I recently hosted Christmas Dinner for the Owls Well family at my house as a response to the baking challenge that A Becky C set me in the beginning of the year.

dsc02435_fotor

Challenge completed!

The most difficult thing about hosting the Christmas ‘Everything Baked’ Dinner at the my place, was not actually the cooking, but that I had to get myself to a place where I felt like I could invite people (specifically family) round to my house without feeling too upset and stressed about it.

I actually started planning for the Christmas Dinner at my place WAY back in October. I called this my “Happy Family Plan“. The goal of my plan was to be able to have the Outlaws stay at my house and invite the Aged Ps round for dinner at the same time. This was a 4 stage plan, as follows:

 Stage 1:  Reorganise/declutter children’s toys and schedules. 

This was so that we could spend more time at home and that we would also enjoy spending more time at home as the living room area would be more presentable. I felt quite stressed about being at home sometimes as I found myself getting upset with the kids and very unhappy when their toys seemed to be everywhere, even after putting the toys away.

Result: I donated many bags of toys to families who would appreciate them more than we would. Spending more time at home was relaxing too.

Stage 2: Reorganise the cupboards 

Our dining table and counter tops were overflowing with things, as was my desk area. The cupboards had been stuffed willy-nilly to keep everything away from prying eyes but it was reaching the stage where I felt bad about how ugly the cupboards were on the inside and couldn’t even bear to open them to put more things away.

Result: I reorganised the children’s clothing cupboards, our craft cupboard and two of our miscellaneous cupboards, and gave away some of the clothes that I knew I would never wear again (i.e. all my maternity and nursing gear, and my pre-pregnancy work wear). I wasn’t able to go through all the cupboards as I didn’t have enough time, this being an emergency plan, but I did manage to find space to make sure the dining table was clear and that the countertops were not overly cluttered.

Stage 3: Reclaim my bedroom space and the spare room space.

The spare room was being used as a temporary holding area (i.e. storage room) and that needed to change if I was going to put the Outlaws up in there. My bedroom space was only being used as a place to sleep and not a place to relax and that needed to change.

Result: This involved getting rid of large furniture items in my bedroom which were being used as glorified clothes horses. I also moved Thumper out of our bedroom and into the children’s room. This led to both myself and the Barn Owl experiencing better sleep and less guilt for not using furniture as intended. I also felt less upset about the state of the spare bedroom (although still a little embarrassed about the cupboards in there!)

Stage 4: Host guests in the house

Obviously, I wanted to feel proud about where we lived, proud enough to show it off to other people. I didn’t want to worry about whether the Aged Ps would leave my house feeling sad at the state of it.

If you look to the top right of the picture above, you can see that I still had laundry hanging up in my dining room – it was raining so it couldn’t go outside – and whilst I was quite embarrassed that I didn’t have anywhere else to put it, at least I felt okay enough to have people come and visit the house.

And look how happy everyone is!

Happy Family Plan Completed!

Notes on the Happy Family Plan:

I set aside Thumper’s 2 hour morning nap time to devote to the decluttering and tidying portion Happy Family Plan, which was the most time-consuming part of this whole event. I would spend only one hour diligently working, then decompress for half an hour with crisps, a cold drink and Youtube. If I felt good enough, I’d do a little bit more during the afternoon, but not more than half an hour as I didn’t want to burn myself out.

I toyed with the idea of selling all my preloved things, even to the point of opening a Carousell account, but in the end I realised that it was more important for me to get the clutter out of sight quickly. Additionally, I decided that my family is fortunate enough to be in a position where we can afford to be charitable. So, I listed everything on various Freecycle sites as I decluttered, so that these things would go to people who wanted or needed them enough to come and collect them from me. Reducing World Suck whilst accomplishing the Happy Family Plan was a huge bonus, and some days I felt a little bit like Santa Claus!

For Stage 3 of the Happy Family Plan, I had to take into account the fact that there might possibly be a difficult transition period whilst J, Little E and Thumper adjust to the new sleeping arrangements, and I didn’t want this to affect J as he was preparing for his year end exams. So I waited until J had completed his last paper before moving Thumper out of our bedroom.

It was surprisingly easy – the 3 kids did take longer to get to sleep at first as they would play with Thumper after lights out, but there was a lot less fuss from Thumper than I’d envisioned. This was because Little E instantly took over the job of comforting Thumper if he woke her up at night and she managed it a lot better than I normally do! Her secret? “I just tell him to lie down and go to sleep”, says she. I must say I was very proud of all of them, especially Little E, who really had a chance to flex her big sister muscles!

Concluding thoughts:

I’m pleased to say that I am really proud of myself for managing to complete the Happy Family Plan within a short time frame and despite the fact that I only had an hour a day to spend on it! Yay for me!

Whilst completing the Happy Family Plan, I went on my personal social media site and asked for advice for how to declutter and organise my cupboards.

This eventually led to one of my family giving me a set of Marie Kondo‘s books for Christmas! I’ll let you know how I feel about it once I finish reading them.

Sisterly Challenge 2016 results – Baking Challenge: PASS

Okay for those of you who have been following the Owls Well sisterly challenges may remember that I gave A Becky C a knitting challenge, whilst she gave me a baking challenge that I was very nervous about.

Well, I would like to say that I completed 4 out of 5 of the baking challenges that A Becky C gave me, which I think warrants a PASS.

I made a traditional baked dessert that was also a pie. I also made something savoury that wasn’t a pie.

And this year, I hosted Christmas ‘Everything Baked’ Dinner for the Owls Well family at my house – and everything that was served (except drinks) had been oven-baked!

Evidence:

dsc02435_fotor

Happy Christmas Dinner!

I made Baked Potato Mash, Roasted Broccoli, Roast Lamb with root vegetables! Yay!

So. How did your knitting challenge go?

12 Ideas for Last Minute Crafty Christmas Joy 2016

The Christmas weekend is upon us and if you are anything like myself, you might be looking for some brilliant ideas for Christmas decor, Christmas party food or Christmas Crafty activities to keep little hands busy whilst the grownups catch up over a glass of eggnog!

Don’t Panic!

Owls Well is here with a round up of a dozen last minute Christmas crafts and general activity for Funtimes And Merriment from around the web!

Christmas Decorations

  1. I really like these super cute and simple paper angels from Growing With The Tans which I think would look very cute on the tree or as seating cards on the table!

  2. This super creative upcycled Nativity scene by Growing Hearts 123 also doubles up as musical instruments which would be fun for carolling (and there’s also a very clever Christmas Angel tutorial)!

  3. Here is a simple but very pretty stocking stuffer by A Pancake Princess using plain wood blocks – and it comes with a free printable!

  4. This is a very straightforward tutorial for shrink art decorations over at Mamawearpapashirt, which the kids can easily get involved in.

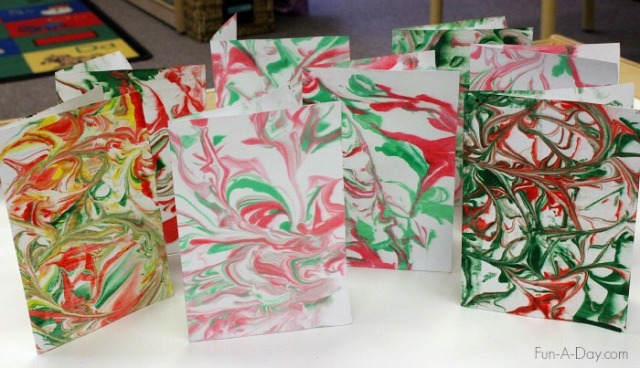
  5. These Marbled Christmas Cards from Fun-A-Day are very unique and a great deal of fun for the kids to make. I mean, who doesn’t love messing about with shaving cream?

    Christmas Gifts

  6. It’s beginning to smell a lot like Christmas – especially with this Homemade Peppermint Sugar Scrub by AdeSays which would make a lovely and useful gift!

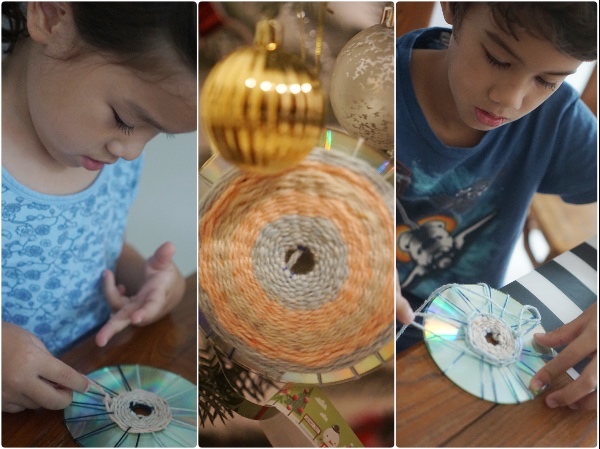
  7. Our Owls Well yarn coasters keep little hands occupied and would make some pretty shiny christmas ornaments too! A perfect take-home craft for a Christmas party.

  8. What could be better than a tray of chocolate cookies fresh from the oven? This frozen cookie dough gift idea from iheartnaptime is brilliant and comes with a free printable – and you can use the Barn Owl’s FoolProof Chewy Chocolate Chip Cookie Recipe too!

  9. I think these Rudolph candy bars from i heart arts n crafts would make very nice door gifts for a Christmas party! You can even set these up on a craft table at the party for any visiting kids


    Christmas Food 

  10. I think these Rudolph Baked Potatoes based on an Annabel Karmel recipe are super cute and would be a real crowd pleaser!

  11. Our Owls Well no-bake cake is a great idea if your oven is full of turkey and has no room for dessert – and the kids can help with it too!

    fridge-cake-no-bake-chocolate-easy-recipe

    Delicious and chocolatey

  12. I really like these Santa Fruit Pops from Clean and Scentsible’s Welcome Elf on a Shelf Breakfast! You might have to do the face yourself, but imagine how much fun the kids would have assembling these.

P.S. For more great ideas, check out our 12 ideas for Last Minute Crafty Christmas Joy from last year as well as 35 Simple and Foolproof Christmas Crafts and Free Printables

P.P.S. And don’t forget to use the Owls Well Christmas Party 2016 playlist for your own party!

A 2016 Christmas Party Playlist

This year, I’m really looking forward to the Christmas Weekend and all the games, music and storytelling that we’ve got planned over here in the Owls Well household!

If you are hosting or throwing a Christmas party this year, here is the Owls Well Christmas 2016 playlist, with all of my handpicked favourite videos from Youtube! I’ve tried to feature more local artistes this year too. This playlist is roughly an hour long, so it’s a good one to put in the background when everyone is eating their Christmas Dinner, or stick on for the kiddies to watch whilst everyone is busy with preparations!

P.S. If you are looking for a much longer playlist to encompass all of party time, check out the Owls Well Christmas 2013 Playlist here.

Last Minute Christmas Dessert: The Outlaw’s Doggie Biscuits (aka Chocolate No Bake Fridge Cake)

So, the Outlaws are in town this year end, which gives me the opportunity to poach one of their favourite dessert recipes, lovingly named ‘Doggie Biscuits’ by the Barn Owl.

This chocolate-based dessert would probably make the worst dog biscuits ever (unless you’re secretly plotting a poisoning of that yapping midnight horror from downstairs), but they sure do make a deliciously satisfying snack! Additionally, this is a fun no-bake dessert to get the kidlets involved in some messy and rewarding fun.

This easy to make dessert is a big favourite in the Owls Well household, and the kids ALWAYS ask their grandma to make some for them (at the behest of the Barn Owl, of course). By the way, I have also included additional Thermomix instructions at the end of the recipe for those of you who own magic stirring pots.

The Outlaw’s Doggie Biscuits Recipe

Ingredients:

  • 12-15 Digestive Biscuits (about 250g)
  • 1 heaped tablespoon of cocoa powder
  • 3 tbsp Golden Syrup (you can also use honey or molasses. We used a date syrup.)
  • 100g unsalted butter
  • 1 bar of chocolate – roughly 200g (we used Cadbury’s Old Gold 70% Chocolate)

chocolate-no-bake-cake-fridge-bar

Method:

  1. Place digestive biscuits in a ziplock bag, squeeze out as mush air as possible, then smash the biscuits into smithereens using a rolling pin. The best way to do this is to get a Batgirl to help you using an old wooden train whistle.
  2. Melt butter in a heatproof bowl set over a saucepan of hot water. Add golden syrup and cocoa powder, then mix until smooth.
  3. Add smashed up biscuits to the mixture, mix together, then pour out into a greased 13×9 inch cake tin to cool.
  4. Pack the biscuit mixture down tightly to form the base of the cake. Use your (clean) hands!
    fridge-cake-chocolate-biscuit-no-bake
  5. Eat biscuit mixture off hands, then wash hands.
  6. Break the chocolate up into pieces then melt in a heatproof bowl set over a saucepan of simmering water.
  7. Once the chocolate is melted, pour over the biscuit base and spread it out as evenly as possible
  8. Lick excess chocolate off spatula
  9. Let the cake cool, then place the cake in the fridge for the chocolate to set
  10. Cut into pieces to serve!
fridge-cake-no-bake-chocolate-easy-recipe

Delicious No-Bake Chocolate Fridge Cake

Upcycling for kids: Spiderweb Christmas Coasters (or Circular Weaving Loom CDs)

So, I was looking at spiderwebs and thinking of Greek Mythology, and I remembered that there used to be circular weaving looms around for seamless knitting of bags and hosiery. I headed onto Google and found a bunch of paper plate weaving crafts but instead of using paper plates, I decided to upcycle a bunch of old blank CDs that I had lying around the house.

Yes, I have a whole spindle of blank CDs that I purchased nearly 10 years ago. They only fit about 400-700MB of information on them, so they are useful for virtually nothing nowadays. I keep them around in case I ever need to burn one or two photos for a friend. But now we can use them for making some great Christmas gifts!

So here’s:

How to Upcycle Old CDs into Pretty Christmas Coasters and Hanging Ornaments

Materials:

  1. Old CDs
  2. Yarn of different colours and textures (I got my yarn from Daiso)
  3. Scissors
  4. (Optional) Old plastic yoghurt pots or takeaway container lids
  5. (Optional) Hole-punch

upcycle-recycle-art-craft-cd-yarn

Instructions:

  1. Cut weaving needles out of yoghurt pots or takeaway container lids. You don’t necessarily need these but I found them useful in preventing the yarn from fraying at the ends. Cut out teardrop shaped plastic pieces from old plastic yoghurt pots or takeaway container lids. Use a hole punch to make a hole through one end. I used a regular paper hole punch for this.
  2. Warp your CD loom using 1.5-2m length of yarn. You do this by looping the yarn through the hole in the middle of the CD. Tie a knot in the first loop.
  3. Make sure that there are an odd number of loops. Any number above 15 looks pretty good, bearing in mind that the more loops you have, the more challenging it is for the weaver. I used about 15-19 loops for 5 year old Little E, and 21-25 loops for 8 year old J. christmas-ornament-craft-gift-coaster-kids
  4. Cut any length of yarn to use for weaving. I got each child to measure out 2 arm-lengths of yarn to start out. Tie one end to any spoke on the warping to start, and the other end to the weaving needle.
  5. Weave the yarn through the spokes of the warping in an under-over-under-over pattern (or under one-skip one-under one-skip one). We used the shiny side of the CD as the weaving side, because it just looks prettier that way.
  6. When you come to the end of the yarn, just tie another length of yarn on and continue the pattern. Experiment with different textures and colours
  7. Try to finish weaving the spiderweb to at least 1 cm from the edge of the CD! It gets quite challenging towards the end.
  8. Once you finish the spiderweb, tie the yarn off to the nearest spoke on the loom, and tuck the ends under the weaving.
  9. You can choose to tie another length of yarn through any one of the wheel spokes so that the weaving can be hung up as a Christmas ornament, or it can be used flat as a drinks coaster – your choice!

weaving-yarn-cd-upcycle-christmas-craft-ornament