Kid’s Art Jamming at My Art Studio

The Learning Palette at My Art Studio

The Learning Palette at My Art Studio

Earlier this month, J and Little E were invited to a trial lesson at My Art Studio, a private art school that aims to enhance early childhood development and learning through creative expression and discovery.

My Art Studio was started by a group of Singaporean parents who were looking for a way to encourage their own children to be imaginative and innovative through the exploration of various artistic techniques and materials. The course teaches children toappreciate visual art (and maybe a little art history too!) and to be confident in their own ability to express themselves through craftwork, drawing and painting.  The Learning Palette, which is My Art Studio’s inhouse programme, is aimed at children from 3-12 years of age, with different levels matched according to each child’s age and ability.

This means that the work produced by the children during class at My Art Studio is 100% their own effort, which is something that is very important to me.

I never expect my children’s artwork to look perfect – what matters to me is that the work is entirely their own.  Some of my friends who have sent their kids to art classes have reported that the children return home with incredible, beautiful pieces of art, but when given the same tools and asked to create another picture, they are unable to do so. To me, this means that the child has not learned to create art independently and to be inventive – but only how to copy. This is why I appreciate art schools like My Art Studio that firmly believe that the process of creative discovery, interpretation and execution is more important than the outcome.

Drafting a self portrait

Drafting a self portrait

During the art lesson, the children present were divided into two levels – INTROductory (3-5 years) and FUNdamental (5-8 years). They were then given a short briefing on single-line portraits in the style of Pablo Picasso. Afterwards, each child was given paper to draft a few very quick sketches of themselves from memory and using only a single unbroken line. This gave the children the opportunity to reflect on their sketches and try to improve their own work with each subsequent drawing.

The art instructors, all qualified professionals in design and art, then floated around the room, either demonstrating the technique again on a separate piece of paper, or giving verbal instructions. I noticed that any hand-holding that occurred was only for the tots around Little E’s age – and this was mostly to correct their pencil grip!

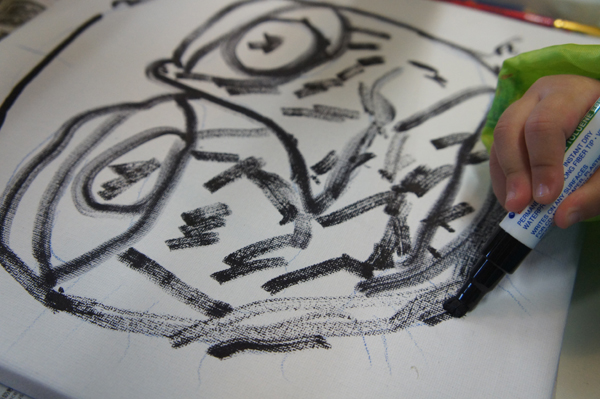
Outlining the sketch on canvas

Outlining the sketch on canvas

After making a few rough sketches on paper, the final image was transferred onto canvas that had first been primed with gesso – clearly some very high quality materials are given to the children to work with –  then, a black marker was used to outline the sketch.

The younger children in Little E’s group were given tempera paints to work with, which are water-based paints that are non-toxic. This is in keeping with the fundamentals of the INTROductory programme for preschoolers, which only uses safe and non-toxic materials. The bigger kids in the FUNdamental group (for 5-8 year olds) used acrylic paints instead, which have a bolder colour.

Filling in the painting

Filling in the painting

J and Little E were really absorbed in their work, quietly and conscientiously focused on their own paintings. The teachers were very good at guiding and encouraging each child in such a way that none of the children felt obliged to look over their shoulder at someone else’s work and compare it to their own. What a wonderful way to encourage individuality in self-expression!

It's all about the environment

It’s all about the environment

My Art Studio encourages a multidisciplinary learning programme and during their lessons.  Children will also explore concepts in math, science, music, nature, language and literacy, all cleverly hidden within a fun environment. At the end of the lesson, J seemed to have some idea of complementary and contrasting colours, which is definitely something that he did not consider before. I’ve also noticed that he has started drafting his ideas out onto scrap paper before deciding on a final image! Little E has also started identifying different shapes that can be added together to make a complete picture, which is a technique that she definitely picked up during the lesson.

Finishing touches

Finishing touches

There was also plenty of opportunity within the class for the children to interact with each other and the room was filled with friendly chatter. They were each encouraged to appraise each other’s paintings in a positive manner and spend a few minutes in a show-and-tell. Even the very shy children had warmed up by the end of the lesson, and were happily talking with the instructors about their works!

Picasso-inspired Single Line Self Portraits

Picasso-inspired Single Line Self Portraits

Here are my kids with their finished portraits! Not bad, huh? I’m impressed!

Oh, and here’s another thing about My Art Studio that impressed me – this private art school is registered with the MOE and not only offers art classes to preschools and primary schools (as part of the school’s art programme – not as an extracurricular enrichment class), but are also open to providing art therapy sessions and working together with organisations that hope to bring joy to children and young people from challenging backgrounds!

The studio also holds art parties, modular art classes for adults, teacher training workshops and corporate events both onsite at their studio in Serangoon Gardens as well as elsewhere. I am personally looking forward to attending a Grown-Up art-jamming session with them in the future!

You can find out more about My Art Studio at their website or Facebook Page.

My Art Studio (Serangoon Gardens): 45 Burghley Drive, #01-13, Burghley Lifestyle Hub, S(559022)

Tel:+65 67373760

Email: info@myartstudio.sg

Peekaboo! We see you!

Peekaboo! We see you!

3 quick and easy Chinese New Year Crafts

Looking for ways to keep the kids occupied during Chinese New Year visitation?

Why not set out some simple crafts that will keep them busy and stop them from raiding the joint and scoffing all pineapple tarts!

These quick and easy crafts are all easily made from materials found around the house during Chinese New Year, so they are just perfect for a last minute kid’s craft – especially if you don’t have any little ones but are expecting visitors who do!

1. Make some goldfish! 

Fish are a symbol of prosperity in chinese households, as the word for fish, ‘yu’, sounds exactly like the word for ‘abundance’. Goldfish are especially prized for their bright red or golden colours, and of course, their name in chinese sounds exactly like ‘an abundance of gold’.

Materials:

  • Small plastic bottle or cardboard toilet roll – I used a Yakult bottle and a Yoghurt bottle for this.
  • Red plastic bag of the wet market variety
  • Tape – I used double-sided tape and masking tape but any form of sticky tape will do.
  • Marker
  • Scissors
  • (Optional)Leftover paper/card/angpows

Goldfish-chinese-new-year-recycled-craft-kids

Instructions:

  1. First, cut the plastic bag in half and tape one side of it to the plastic bottle or toilet roll.
  2. Roll the bag tightly around the bottle or toilet roll so that it is completely covered.
  3. Fix the bag in place using more tape. Then, stuff one end of the plastic bag into the open hole of the bottle or toilet roll. This will be the mouth of the goldfish.
  4. Add accents or embellishments using a marker or paper. You can use torn or cut pieces of angpow or paper to form fins and eyes.
  5. Cut a strip of plastic bag and tie it tightly around the bottom of the bottle or toilet roll. This forms the goldfish tail. You can make the goldfish tail appear fuller by cutting it into strips.

(Optional) If the bottle you use has a narrow neck, you can tie another strip of plastic bag around the narrowed area to make the goldfish head more obvious.

Goldfish!

Goldfish!

2. Make a festive lantern bunting!

Most households will have these hung up as decorations during the Chinese New Year period. The bold red paper lanterns, with gold words or designs painting on them, are symbolic of a wish for a bright future.

So shiny!

So shiny!

Materials:

  • Paper
  • Used Angpows – try to choose angpows with glittery gold designs on them
  • Glue
  • (Optional) Red markers/paint/colour pencils

Instructions:

  1. You can draw a picture of a lantern on a piece of paper, or use this Chinese Lantern Colouring Page as a template (just click to download the file)
  2. (Optional) Colour the lantern red – we used red tempera paint for this
  3. Tear up the angpows and glue them onto the lantern. If you have already painted the lantern red, you do not have to use so many angpow pieces!
  4. (Optional) We just made one and hung it from a length of yarn, but you can make several of these and string them up to make a festive bunting!

3. Make a decorative Chinese New Year banner!

Scrolls and banners with good luck messages are hung up around the household during Chinese New Year, which creates a colourful atmosphere. For our banner, we made a painting of plum blossoms along with the symbol of spring.

Spring into the new year!

Spring into the new year!

Materials:

  • Black and red markers or paint
  • Newsprint or plain paper cut into a half ring shape
  • Red or brown paper bag cut into a larger half ring shape (we used pink paper)
  • Scissors
  • Tape or glue

Instructions:

  1. Using the black markers or paint, draw a few long lines across a piece of newsprint or plain paper – they may crisscross each other. Add extra short lines as branches.
  2. Using red markers or paint, make red blotches randomly across the lines.
  3. Use the Black marker or paint to copy the symbol for ‘spring’
  4. Glue or tape the finished picture to the red or brown paper bag or pink paper.
  5. Use the red marker or paint to outline your painting.
Happy Chinese New Year!

Happy Chinese New Year!

Terrariums are Fun: A guide to making your own

For my birthday last year, my good friend A (from A Skip Hop and a Jump) gave me a really cool gift – an afternoon at a Terrarium workshop with Rosebud’s own UK-trained florist, Cindy. Thanks, A!

Now, unlike my friend A, who used to moonlight at a florists during her school days, I am absolutely terrible at looking after all things green and growing. This is a job that I usually leave to The Husband, who used to work in a garden centre in his spare time.

However, I do love having plants in the household and I was intrigued by the idea of making a closed ecological system in a bottle which will flourish without too much interference on my part! I managed to convince the Aged Ps to babysit the two owlets whilst I traipsed down to International Plaza for a girly floral afternoon out!

Tips and Tools for Terrarium Making

Tips and Tools for Terrarium Making

We started out the workshop with Cindy showing us all the tools needed to make a terrarium. We were each given the following:

  1. A clean glass jar with a wide neck and a lid that gives a good seal
  2. A pair of chopsticks (to use for handling the seedlings)
  3. A plastic spoon (to use as a scoop)
  4. A plastic cocktail muddler
  5. Crushed pebbles or coarse sand
  6. Organic potting soil
  7. Pretty pebbles and tiny ornaments
  8. A selection of seedlings of the type that survive well in low light conditions
  9. A dry paintbrush
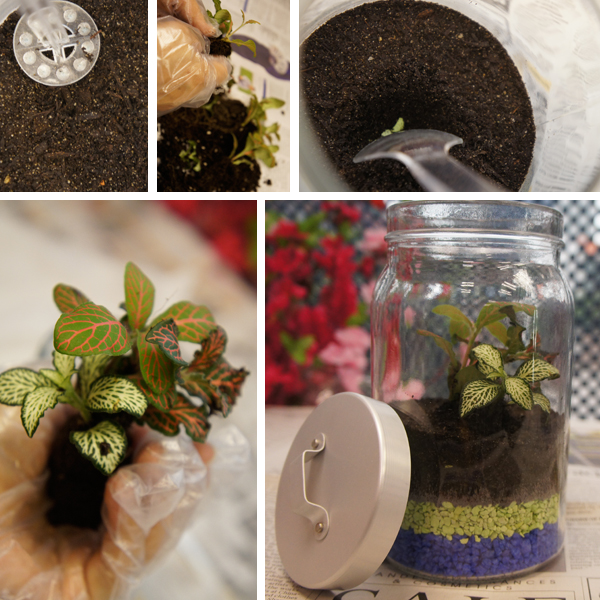
The groundwork

The groundwork

We started out by choosing crushed pebbles or coarse sand in contrasting colours. These crushed pebbles are placed at the bottom of the terrarium to provide adequate drainage for the plants and to prevent roots of the plant from sitting in pools of water.

Our terrariums were to have a fairytale, miniature garden theme, which is why we used brightly coloured pebbles, but if you prefer a more natural look, you can use crushed river stones or sand.

We started out by scooping in two layers of pebbles, packing each layer down with the plastic cocktail muddler. The difficult part was making sure that each layer was exactly even at the top.

Then, we added a layer of organic soil and packed that down as tightly as possible. The potting soil that we used had a nice, fresh scent and was very pleasant, with a nice crumbly texture. If your potting mix is the stinky kind, then you should probably add some charcoal in to absorb unpleasant smells.

The drainage and soil layers should each be around an inch thick, but a good rule of thumb to follow is make sure that the depth of the ground layers is about a third the height of the container that you are using.

Now with the groundwork completed, it is time to add the plants! Cindy, our long-suffering trainer, had already separated out all the little plantlets into groups of three, each carefully compressed together in a tight root ball for potting.

The most difficult bit

The most difficult bit – planting.

Using the plastic spoons and chopsticks, we each carefully scooped out a small hole in the centre of our garden and maneuvered our little plants into position with all the precision of a surgeon. When the plants were firmly plugged into place, we added more soil to cover up the root ball, packing it down firmly but carefully around the plant with the muddler, then used a dry paint brush to dust off any bits of soil clinging to the plant leaves.

My plants seemed to be sagging to one side, so Cindy advised me to use the blunt end of my chopsticks to push some large stones into the soil under the plant to prop it up whilst also anchoring the root ball in place.

Adding embellishments

Adding embellishments for that final touch

With our little plants happily rooted, now it was time to decorate our bottle gardens with colourful crushed pebbles and embellishments. We used small smooth stones that had a nice even colour, as well as tiny ceramic, wood or plastic ornaments to embellish our terrariums.

I picked out a little blue moon rabbit, and a cheerful red toadstool on a bed of blue and yellow pebbles. These were neatly taped to either toothpicks or attached to floral wires and pushed firmly into the soil.

A few squirts of water down the sides of the jar, then the lids went on and we were done!

SkipHop and I with our completed Terrariums

Posing with our completed Terrariums

After this, we would only have to add more water every few weeks, and occasionally open the jar up for a few minutes to let the excess condensation evaporate and stop it from clouding the glass. As Cindy said, ‘What’s the point of making a garden that you can’t see?’

It’s been a month since we made the terrariums, and I’m pleased to say that as a result of Cindy’s advice and supervision at the start, all three of my little plants have survived and are growing very well! They seem to do best under flourescent light, as direct sunlight magnified by the curved glass of the bottle seems to burn them. I have even had to prune back one of my little plants because it was growing almost up to the top of the jar!

I am tempted to make a few more little terrariums with J and Little E – I think it would be fun for them and give them a good excuse to mess about with dirt and pebbles.

Howe to Kille Insects

I have a fruit fly problem.  Ever since I planted the strawberries, my balcony has been inundated with a never-ending stream of the little monsters.  To make matters worse, I’ve got a mosquito in my bedroom as well, which has been keeping me and my poor little rats up at night every night for the past three months at least.  I’m currently averaging at one mosquito slapped to death every three days.

Since I have pet rats, I’m not a particular fan of insect sprays a most of them are pretty bad for the environment and humans too.  Ultrasonic mosquito botherers are also right out of the question since they tend to drive animals crazy with their high-pitched whining and apparently don’t have a very good track record.  Citronella oil has a pretty good success rate at driving mosquitoes away, but has to be reapplied quite often.

No, I’m in the market for a more permanent solution to my flying insect blues.  Thus, the plan.

Step 1: Penny

Penny Dreadful.  I would have named her Audrey, but she's no Venus Flytrap

Penny Dreadful. I would have named her Audrey, but she’s no Venus Flytrap

This is Penny.  Penny is a very hungry and very thirsty little pitcher plant that I purchased from Newtown Garden Market.  Right now, practically all her pitchers are filled with a combination of drowning fruit flies and some sort of insect slurry, which is good because it means that Penny is eating well.

When choosing a carnivorous plant, I really wanted to go for quantity over quality, and pitcher plants really have one of the highest fruit fly killing rates.  Being a swamp plant, they’re very thirsty and also need plenty of shade, but are otherwise ridiculously easy to care for – just mix up some peat and sphagnum moss, stick them in a self-watering pot and Bob’s your uncle.  As a plus, there are also pitcher plants native to Australia, though Penny isn’t one of them, which is unfortunate.

Step 2: The Dip

In Who Framed Roger Rabbit, the Dip is a nasty greenish mix of turpentine, benzene and acetone guaranteed to kill any toon that it touches[1].  On my balcony, the dip is a mixture of apple cider vinegar, soap and water placed in a wide-brimmed container.  This mixture is guaranteed to drown fruit flies in the tens of thousands.

Death... DEATH DEAAAAATTTHHH Mwhahahahaha

Death… DEATH DEAAAAATTTHHH Mwhahahahaha

Fruit flies are attracted to the dip because of the apple cider vinegar, which basically smells of fermented fruit.  However, landing on the dip results in instant fruit fly death as the decreased surface tension of the water causes them to sink right into the mixture, drowning horribly while I cackle in glee.

For best results, use a lemony soap, but don’t overdo it on the vinegar or the mixture won’t work.

Step 3: Electrical Mosquito Sucky Trap Thing

Mosquito Sucky Death Trap of Doom and Doominess.

Mosquito Sucky Death Trap of Doom and Doominess.

This electronic marvel comes to me courtesy of Droo, who discovered it on the Jaycar website and brought it to my attention.

This fantastic device comprises of a fan, several UV lights and a titanium dioxide ring.  Titanium dioxide reacts to UV by breaking down organic matter like bacteria into water and carbon dioxide.  The lights create a small amount of heat.  The heat, water and carbon dioxide attracts passing mosquitoes, who being weak and slow flyers, are sucked into the device by the spinning fan.

Once inside the device, they can NEVER escape again, and will spend the rest of their (brief) lives in the bottom of the device being swirled about by the cruel crosswinds of fate until they die from dehydration.  Mwahahaha.

Seeing as there’s about 10 mosquito corpses in the thing, I do believe it actually works.


[1] RIP little shoe guy. You didn’t deserve your fate.

KidsFest 2014: We’re Going On A Bear Hunt Live! (A Review)

Michael Rosen has been one of my favourite poets ever since I received a copy of Quick, Let’s Get Out Of Here (I was 8 years old at the time), and discovered that poetry doesn’t always have to have rhymes in it. Discovering the world of free verse really helped me to develop into the pretentious person that I am today – huzzah!

When J was born, one of the first books that I bought for him was Michael Rosen’s We’re Going On A Bear HuntThis story is based on a very old folk song, but Michael Rosen lengthened the adventure to include more varieties of terrain that the explorers have to cover in search of the elusive bear, and he also added a little twist of onomatopoeic, alliterative language which really brings life to the environment.

A wonderful first book

A wonderful first book

With its gorgeous watercolour illustrations by Helen Oxenbury and catchy rhythmic phrases, this little story quickly became one of our favourites. I have read it so many times to both J and Little E over the last 6 years, that we all know it by heart.

When the fine folk behind KidsFest 2014 invited my family to watch We’re Going on a Bear Hunt! live on stage, I was so excited about the opportunity that I grabbed the kids and did a happy dance with them in the living room! Since then, we’ve been reading the story together more often and reciting it in the car on the way to school with all the appropriate sound effects.

We're going to watch a Bear Hunt, It's going to be a great one!

We’re going to watch A Bear Hunt, it’s going to be a great one!

I did not want my kids to think that the stage show was going to visually resemble the paintings in the book, so in order to prepare my kids for the performance, I  showed them the official stage show trailer, which you can see below:

By the way, if you don’t already own a copy of the book, you can get your kids familiarised with the story by letting them watch this brilliant reading of the book done by the author, Michael Rosen. This will help your child anticipate the different elements of the story in preparation for the interactive nature of the play!

Yesterday, we watched the opening performance of We’re Going On a Bear Hunt at The Drama Centre and it was absolutely marvelous! My five year old J was so caught up, he was clapping and frolicking along to the music, laughing his head off. There was plenty of audience participation, which was absolutely brilliant for my wiggly two year old Little E, who even joined in the singing towards the end.

We Are Going On A Bear Hunt - Kenny Wax & Nick Brooke Productions

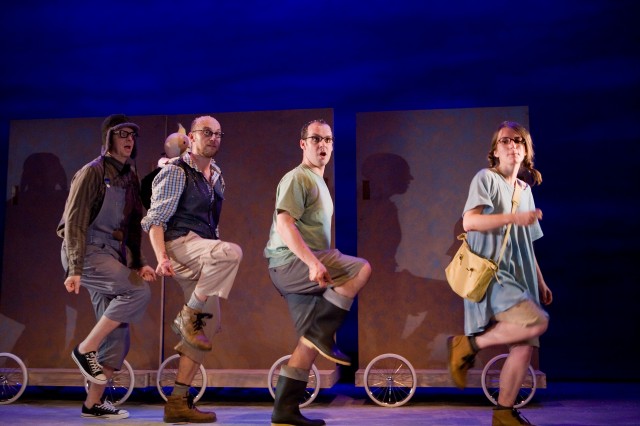
Uh-uh! A Forest!

The cast retells the story in a creative (and messy!) way with an animated and engaging performance, and the bear’s appearance at the end – although tense and exciting – is still cuddly enough to keep the younger members of the audience from freaking out.

The children were very inspired by the sets and ingenious use of props, and after the show was over, they both immediately started discussing ways they can recreate different scenes at home! I foresee some very messy craft sessions coming up in the following weeks!

What a beautiful day! We're not scared...

What a beautiful play! We’re not scared…

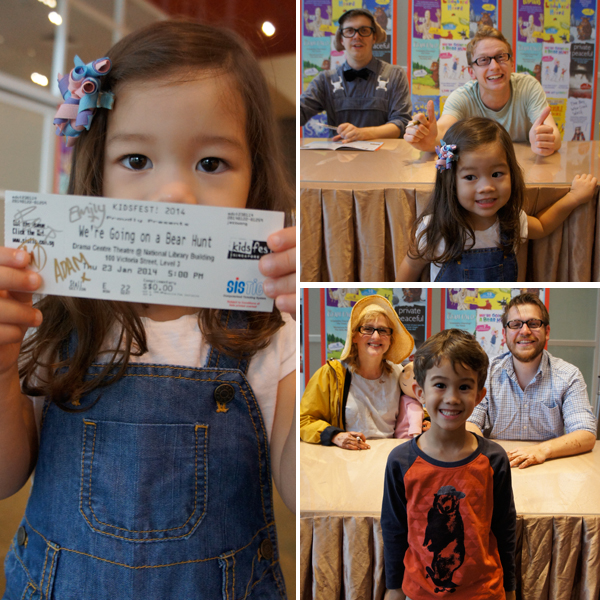
Afterwards, we had the chance to meet the cast during the KidsFest+ autograph session. All of the cast members, Gareth Warren (‘Dad’), Emily Smith (‘Daughter’), Adam Collier (‘Son’) and Ben Harrison (‘Buddy the Dog’) were delightful in person and very patient with all of the children, although there was not much time for the kids to really interact and ask questions whilst being hurried along the queue.

I want to go on a bear hunt AGAIN!

I want to go on a bear hunt AGAIN!

The kids enjoyed themselves so much today, I really wanted to prolong the experience with some related activities and crafts.

Here are some brilliant learning activities that I found for kids who are fans of the book and the live stage performance! (I also think they would come in very handy for anyone planning a Bear Hunt-themed party.)

Just click on the links below to download the free handbook and printables:

1. Bear Hunt Live! Educational Activities and Games

2. We’re Going on a Bear Hunt Colouring Sheets

We’re Going on a Bear Hunt is currently playing from 23rd – 26th January 2014 at the Drama Centre Theatre. Tickets are available at the box office or via SISTIC.

KidsFest 2014 will running until the 9th February 2014 and there is something for both the tiny tots as well as the older children. I really recommend going to watch We’re Going on a Bear Hunt, but there are plenty of other shows that are worth a look!

Recommended for children aged 2-3 and above:

  1. The Gruffalo: 25 to 26 Jan 2014 at the Drama Centre
  2. What the Ladybird Heard21 Jan to 1 Feb 2014 at the DBS Arts Centre
  3. The Snow Dragon29 Jan to 2 Feb 2014 at the Drama Centre
  4. The Boy who cried Wolf: 31 Jan to 9 Feb 2014 at the DBS Arts Centre

Recommended for children aged 7-8 and above:

  1. Horrible Histories Awful Egyptians31st Jan to 1st Feb at the DBS Arts Centre
  2. Horrible Histories Terrible Tudors1 Feb to 9 Feb at the DBS Arts Centre
  3. Private Peaceful: 22 Jan to 2 Feb at the DBS Arts Centre

The Chocolate Shop (or, How to Raise a Mini Python)

J: Mummy, I have a Great Idea.

Debs: Cool, tell me.

J: Ok, my idea is to have bombs that look like chocolates. KA-BOOM!!!

Debs: Argh! That’s horrible! Then, if you open the chocolate box, it will explode and make a huge mess!

J: No! That is not what will happen!

Debs: Oh?

J: No, you open the box first, then you pick one up and you say ‘Oooo, yummy! Chocolate!’, then you put it in your mouth and crunch it and THEN it will explode! HAHAHAHAHAHAHA!!!

Ten Things I learned in Boarding School

There’s nothing like two years away from ones parents to learn many valuable life lessons.  Living in a boarding school helped hone me into the adult that I am today and taught me some basic urban survival skills.  Some of these things I learned from firsthand experience, and others from observation.

So, without further ado and in no particular order, here are ten things I learned in boarding school:

1.  Don’t put the can in the microwave.

In my defence, I was NOT the person to put the can in the microwave.  Many of the girls in my school were from fairly rich homes and did not know the basics of using home appliances.  This was such a common occurrence that we actually had a “Microcan” drill in place.

One evening while a bunch of us were in the common room watching TV, a year 11 student walked in and started using the microwave.  After a few moments, there was a distinct smell of something burning.  Within seconds, we tipped the couch over and everyone huddled behind it as the can in the microwave started to spark and deform.  I watched in slight horror as the can turned the microwave’s interior into one of those plasma balls, then the entire thing exploded, blowing the door off the microwave and showering the room in boiling soup and semi-molten tin.

I think it’s a testament to the commonness of this occurrence that almost immediately after the explosion, the oldest boarding school veteran simply walked out from behind the couch, picked up the fire extinguisher and calmly put all the fires out while the rest of us ran about screaming our heads off.

Nobody was hurt, but everybody took that lesson to heart.

2.  Instructions are there for a reason: Read them and follow them.

I cannot stress this highly enough.

We had a rail toaster in the dining room.  This rail toaster was covered, COVERED in signs that read “Do not put cheese in the toaster” and “Do not put cheese on your toast and then put it in the toaster”.  The table that this toaster sat on was covered in these signs.  The wall behind this toaster was covered in these signs.  Yet, once a semester, one doozy girl would somehow manage to ignore all these signs and stick cheese in the toaster, which would fall off her bread and into the toaster’s heating element, where it would not only gum up the inner mechanisms of the toaster, but would also cause the dormitory above to smell of rotting cheese for a month.

ALWAYS read and follow the instructions within good reason, which brings me to my next point…

3.  Just because the box has a label on it doesn’t mean it contains what you think it contains.

Nutella bottle, vegemite filling.  ‘Nuff said.

4.  Tea tree oil cleans EVERYTHING.

This was something that I learned from my roommate in year 12.  Her room was always spotless during spot checks.  Her secret weapon?  Tea tree oil.

This stuff cleans everything and I mean EVERYTHING.  Got a stubborn stain on your wall?  Add a dash of tea tree oil and it’s gone!  Want to bleach out some clothes?  Tea tree oil.  It kills the mould.  Want to get rid of acne?  Tea tree oil.  It’s great for sterilizing the bacteria in them.  The applications are endless and simply dependent on the level of dilution.

5.  How to shower in 5 minutes flat in boiling hot water.

Since the school I went to was a single sex school, the school board did not see fit to provide us with much by way of privacy in the showers.  Individual shower stalls were separated from each other by low walls and curtains.  We did not have ensuite bathrooms or lockable stalls.  One of the girls made a killing on the teenage soft-core pornography market by selling videos of the other boarders in the shower.

To prevent myself from ending up on “Girls Gone Wild”, I developed a method of preventing myself from ever being caught on camera.  First, I would ensure that whatever water I was bathing in was boiling hot, which meant tons and tons of steam.  I never stepped into the showers without ensuring that there was plenty of steam in the cubicle.  Then, it’s just a matter of stepping into the shower, washing and soaping up quickly and stepping out.  There’s a specific method to the madness, but I won’t go into much detail there.

Suffice to say, I got cleaned and the only time this girl tried getting a video of me in the shower, there was so much steam that it knocked her camera for a loop.

6.  Always hide your chocolates in your sombrero.

I love chocolate.  I adore chocolate, which is why I always have a stash of chocolate in my room.  Always.  (It’s currently in the underwear drawer next to the socks).  That being said, when I was in boarding school, hiding chocolate was a little bit more difficult given the close quarters that we were all sharing.  No matter where I hid the stuff, my stash was always raided.  Until I discovered the ultimate way to hide it.

For some reason, the girls in the boarding school had gifted me with a green sombrero.  This hideous hat was never worn except to certain school events.  The rest of the time, it hung on the wall of my dormitory.  Seeing as my chocolate stash was raided reqularly, I decided that the best place for it was inside the sombrero.  That way, when anyone asked where my stash was, I could honestly reply, “In the sombrero.”

Nobody believed me.

7.  Red Bull gives you wings; Red Cordial just makes you insane

On a dare, I spent an entire semester drinking nothing but red cordial.  I do not remember a thing about that semester.  Any memories I do have about that semester seem to be obscured by a pastel haze of hyperactivity and weird exaggeration.

I have never touched the stuff since.

8.  If you’re going to eat it.  Eat it.

This applies to all foodstuffs, whether you’re in a dormitory, a share house or even in the office.  It doesn’t matter if you label the container in big red letters or stick your sandwich in a lock box.  If it’s in the common fridge, someone is going to assume it’s abandoned and eat it.

So, if you’re going to eat it, eat it.  If not, you can stick it in the common fridge, but there will always be a chance it won’t be there when you get back.

9.  If you leave the lamp on your seedlings, you’re going to fry your seedlings.

I like gardening.  One of the things I did when staying in the dorm was attempt to raise a herb garden, however, I wasn’t allowed to use the school grounds to store my plants.  I had to put them in my room.  There wasn’t much by way of natural light in the dormitory during the day.  The windows were very small (and barred with nails down the bottom to prevent escapees), and the lights were turned off while the girls were at school.

I thought to give my seedlings some light by using my desk lamp.  I put them under for 12 hours.  And they fried to a crisp.  It was not exactly a triumphant moment of gardening.

10.  If all else fails, pretend to vomit

For a reason that I cannot recall, we were celebrating the Australian team getting into the World Cup Final by spraying shaving cream all over the place.

No.  It wasn’t my idea.

In any case, around the time the common room floor was covered in shaving cream, we heard the familiar clop clop of the House Mistress walking up the stairs.  Since we would most certainly be in trouble for messing up the common room, we decided to fix the problem by creating MORE mess.  Specifically, one girl solved the problem by pouring milk over the shaving cream, then getting on her hands and knees and going…

“BLAAARRGGGHGGGHH.”

It actually worked.

Pins and Needles

Check it out, isn't it adorable?

Check it out, isn’t it adorable?

To facilitate neatness in my home as well as provide a storage space for my sewing supplies, I recently purchased a large and most beautiful sewing box from Morris and Sons.  It was a bit of an impulse purchase.  I was really at the shop to buy thread, but when I saw this adorable box on the shelf, I just had to have it.  The red-striped cover was so cute and I loved the soothing blue sewing kit pattern on the side too!

What's in the box?

What’s in the box?

As far as sewing boxes go, it’s mid range but not exactly the greatest.  The hinge on the box doesn’t allow it to open fully, which means it collapses shut when it’s opened.  Instead of tiers, it only has a single removable plastic tray for organising stuff, which is a bit of a drawback because I am constantly knocking the tray over and and scattering its contents when it’s out.  It does come with a built-in pincushion and pockets to hold my sewing patterns, which is a plus.  It’s also got a good, sturdy carry handle and enough space in it to hold all my stuff.

Of course, it’s not much of a sewing box if it isn’t fully stocked.  In the tray, I have a good pair of embroidery scissors, a pair of gold-plated size 24 needles, a retractable measuring tape and two colours of DMC thread that I am using on my current project.  Inside the box, I have a good 2 metres of 16-count aida cloth (my favourite size to work with) and assorted DMC threads, which are all strung out on these tiny thread hangers.

My favourite tool of all of these are the scissors, by the way, which cost me a good $50.  They’re a pair of super-sharp and incredibly accurate Gingher embroidery scissors and come with their own leather sheath.  These scissors were specifically made for embroidery thread and they’re perfect at busting apart knots when you need to unpick things without damaging the threads below them, a feature that I regularly make use of when working on cross stitching projects.

What’s in your sewing box, Debs?  I know that you own a sewing machine, so I bet the contents totally differ from mine.

Enhanced by Zemanta

A Groovy Return to School (and an exclusive discount code!)

It has been really busy for me this week! Little E started school for the very first time and it has been a challenging time for her as she adjusts to a more structured morning routine.

I always try my best to encourage and support my kids by doing plenty of education-based activities with them at home using learning aids. I hope that by doing this, I will be able to avoid having to send the kids for after-school tuition classes in the future.

Here are a couple of really brilliant (and affordable) learning aids for preschoolers from our favourite online bookstore The Groovy Giraffe:

learning-aids-books-discount-flashcards

1. Fisher-Price: Fun with Alphabets Flash Cards – SGD$6.90 (RRP: SGD$9.50)

These alphabet flashcards are great for teaching children how to recognise letters and associate the letters with the phonetic sounds. A good grounding in phonics is one of the keys to learning how to read! These cards are sturdy and small enough to be carried around in your bag so they are great for whipping out at a moment’s notice if you want to keep your kids gainfully occupied during long bus rides (or at wedding dinners). The bright and vibrant illustrations are super-cute too, and would look great on the wall of the nursery!

There’s also a Fisher-Price flash card set of Numbers as well as a set of colours and shapes

2. Sesame Street Colors, Shapes & Opposites Flash Cards – SGD$4.50 (RRP: SGD$0.73)

If your kids are Sesame Street fans, this set of cards would be right up your alley! This set of cards comes with a ton of suggestions for card games and activities that you can play with your kids. What a fun way to reinforce the different colours and shapes with your preschooler. Little E is currently into matching memory games, so this set would be great for her! When they outgrow the cards, you can still pick out your favourites and have them framed – they would be awesome for brightening up a room!

3. Shapes – Photographic Learning Lacing Cards – SGD $16.50 (RRP: SGD$12.90)

I like lacing cards for encouraging kids to develop their fine motor skills, and these cards have lovely pictures of toys that form different basic shapes . Lacing cards can really keep my kids occupied for ages. Since the cards are flat and take up very little room, they are brilliant to take along for long journeys (especially aeroplane rides, for when you really need them to sit quietly in one place!).

4. Read & Write Inc. Phonics & Flashcards In A Bag – SGD $46.90 (RRP: SGD $85.80)

This set of nine storybooks are part of Read & Write Inc, a hugely successful literacy programme in the UK developed by Ruth Miskin, who is one of the leading authorities in the UK on teaching children to read. The beautifully illustrated storybooks help to reinforce and develop the learning of phonics, and this set includes 64 sound picture flashcards as well as a helpful manual for parents to help their kids to learn to read. At less than fifty bucks, this set is a real bargain!

5. DK First Reference: Science Encyclopedia – SGD $13.90 (RRP S$21.98)

Most preschoolers love to ask questions about the world and this is a brilliant book that will help you to answer all their millions of questions! The book covers earth and space science, physical science as well as life science. The gorgeous close-up photographs and full colour illustrations will really guide your budding young scientist on their journey of discovery and inspire them to think and make observations about our amazing world. You can also get the DK First Atlas if you want to help your kids find out more about other countries and cultures!

*****

By the way, The Groovy Giraffe also has a massive selection of assessment books for both primary and secondary school students, and some of these are currently available at the ridiculously low price of SGD$2.90 at their Back to School Sale! THAT IS CHEAP AS FREE!!!

A Bonus for Owls Well Readers: Use our exclusive promotion code ‘owlsb2sch‘ for an additional 20% discount on any book or item in the Education category with a minimum storewide spend of SGD$30 (valid from now until 31st January 2014). Local shipping within Singapore is free for orders above SGD$60.

(All prices printed are correct at the time of this post. We are proud to be part of The Groovy Giraffe’s affiliate programme. Thank you for supporting the sponsors that make Owls Well possible!)

MINDScrafting Party (and Charity Drive!)

Last month, I got together with a group of Singaporean blogger moms for a crafting party for MINDS online charity drive (henceforth known as the MINDScraft Project) that we are hosting on our blogs (I’ll link to all the other moms blogs at the end of this post!).

We all met up at Mama J’s place. Mama J (from Mum in the Making) is into scrapbooking and crafting, so she had a fantabulous array of equipment available for us all to use. It was incredible!

Each of us got to choose from a selection of gorgeous acid-free papers that was given to us by Claudia from The Loving Mum (Thanks, Claudia!). But the real fun was playing with Mama J’s scrapbooking tools.

Scrap Party!

Scrap Party!

There were all sorts of specialised hole-punchers and stencils and stamps and different types of adhesives and fancy cutters and ribbons and buttons and sequins and yarn and washi-tape! I had no idea that half of this stuff was out there on that table. It was like a crash course in papercraft for me.

I mean, here’s what I brought to the MINDS-craft Project:

Cheap scissors from stationary shop

Cheap scissors from stationary shop

I learned so much about layering and matching papers, and distressing and how to correctly ink stamps. Mama J showed me how to use a sponge and ink to add depth to layers, and Pamela from The Tan Family Chronicles took charge of this incredible die-cut machine and happily cranked out dozens of die-cut flower petals.

Fancy tools and techniques

Fancy tools and techniques

In the end, we each took home a stack of papers and embellishments, and you will be seeing (and hopefully, purchasing) the work off our blogs pretty soon!

Here are some of the cards that I made:

6x6 inch handmade cards

6×6 inch handmade cards

These are all 6×6 inch cards, all handmade from quality acid-free scrapbooking paper. The inside of the cards are left blank for your own personal message! Each card comes with a pale pink square envelope.

I also made some gift tags, or gift toppers, out of thick and sturdy cardboard coasters. I think these would look really pretty on the top of a present! The backs of the tags are left blank for your own message.

4x4 inch gift tags or toppers

4×4 inch gift tags or toppers

I will be selling the cards or gift tags in sets of two (check out my Facebook page to see what sets are still available), for the low, low price of SGD$5.00 a set (not including postage) and 100% of the proceeds will be donated directly to MINDS.

Please email me at 4owlswell@gmail.com if you would like to support our cause and bring some of these pretties home!

If you would like to know more about MINDS and the good work that they do, check out my original blog post here or visit the MINDS website.

If you want to check out some of the other Mom bloggers who are taking part in the MINDScraft Project, follow the links below:

  1. Mummy Wee
  2. Mama wear Papa shirt
  3. A Juggling Mum 
  4. Mum in the Making
  5. A Dollop of Me
  6. Life is in the Small Things
  7. Tan Family Chronicles