Now, I was thinking…now that you have kinda gotten your garden figured out and it is not full of boulders and tree stumps, I think you are ready for a new challenge!
During the series, Tom Goode, a successful but harassed draftsman, decides to eschew his corporate life in favour of becoming self-sufficient. He was supported in this harebrained mid-life crisis by his wife, Barbara Goode, the most gung-ho lady you might ever hope to meet. Together, they began growing food in the garden to the chagrin of his neighbourhood, making their own clothes and even generating electricity!
This series grew to be so popular that the Queen requested a Royal Command Performance which turned out to be a private viewing of the filming of the final episode, performed live in one take.
No, I am not suggesting that you quit your job in order to go and build your own nuclear reactor or meet the Queen! Put down that letter of resignation now!
I am going to give you a ‘The Good Life’ challenge!
Here are the three elements of the challenge:
You have to give us a ‘The Good Life’ post on Owls Well once a fortnight. With pictures. This update can be a general update on how your garden is doing, or a something that you have learned or observed whilst in your garden. (And yes, your rabbits are in your garden so that is counted. Even though you have no plans to eat your rabbits.)
You have to sell some of the produce from your garden for real cash money. Barter trade is also acceptable.
You have to cook a meal for the Aged Ps that includes produce from your garden. (Bonus points if it’s a multi course meal!)
P.S. If you build this generator, you can consider your challenge completed!
Months ago, Thumper was reaching the stage where he was starting to push himself around the house. He grabbed everything in sight and the first thing he’d do is shove it into his mouth. He was so excited to learn about the world, he just crawled everywhere with his little tongue hanging out of his mouth like a puppy.
Of course, this meant that it was time to put all the Legos away, as the tiny pieces are all potential choking hazards. I also had to put away our beloved Citiblocs away as prolonged chewing and sucking on the porous wooden pieces would probably ruin them. I brought out our trusty set of Duplo blocks, hoping that this would appease J and Little E, who complained loudly and at length as I put away their favourite construction toys.
Unfortunately, the Duplos no longer interested them (I mean, once you start on Legos and Citiblocs, it’s really hard to go back!) so I started looking out for toys that would be fun for my 8 year old, challenge my 5 year old but still be safe for my little crawler.
This is when local enrichment center, Explorer Junior (not to be confused with Junior Explorers Singapore) , introduced me to the wonderful world of Miclik – and I’m glad to say that it’s a toy that all my three kids can play with together.
I find Miclik to be such an elegant and innovative toy. Really, I expect nothing less from a building toy that is created in Barcelona, one of the leading centres of architecture and design. Marc Castelló, the founder and designer behind the boutique toy company, Mitoi, aims to spark children’s imagination and creativity through his unique and ingenious toys, and I really think that he has succeeded in doing so!
The Miclik toy is a modular construction toy that basically consists of colourful flat hexagons of firm plastic. Each hexagon is hinged in the middle allowing the pieces to be bent back and forth like butterfly wings. It is this very flexibility that the key to opening up a vast world of creative opportunity.
The pieces snap together quickly and easily, and my kids quickly immersed themselves in creating elaborate 3-dimensional structures and wearables for role-play. Best of all, the Miclik toys have undergone rigorous lab-testing to ensure that they are safe and non-toxic – so I don’t have to worry if Thumper uses them as chew toys!
I brought these toys out during a party and they were a real hit with all the children present, who were completely engrossed in making crowns, bracelets and swords, even a pair of handcuffs!
I have never had another construction toy that was so quickly used for interactive, imaginative play.
This is now our toy of choice in the living room, and I often peek in on the three kids to find them on another Miclik adventure. Sometimes they are wearing helmets and defending Thumper with swords and shields, other times they are making hiking boots or snowshoes for expeditions across the Arctic, sometimes I stumble across a herd of Miclik cows and chickens. It’s amazing where this toy has taken them!
Buyer’s Note: Explorer Junior is currently the sole distributor of Miclik toys in Singapore (click here to go to their online store). They may seem pricey at SGD$49.90 (for 48 pcs) or SGD$79.90 (for 96pcs) but they are worth it. I would be very cautious in purchasing cheap imitations as they will not be certified non-toxic or made from the same durable materials.
P.S. Explorer Junior is very kindly offering an exclusive discount code for all Owls Well readers! From now until 15th June 2016, just enter the code OWLS10 at checkout to take 10% off your order! Thanks Explorer Junior!
Don’t just take my word for it – check out these other reviews over at Mum in the Making and Mum’s Calling and see what their Miclik creations!
I love wooden building blocks so much that I’ve amassed a rather sizeable collection. I just love the tactile feel of the wood beneath my fingers and the scope for creativity that building blocks have (and the fact that I can build and disassemble structures without pain). However, J and Little E have moved on from wooden building blocks to Legos quite a long time ago, as the sort of creations that they could make with building blocks were limited by the fact that their creations kept breaking apart or toppling over. The blocks have been in storage for quite a while now, waiting for Thumper to get old enough to play with them.
Pamela immediately whipping out her mobile phone, saying “Ok Debs, I know you have a ton of blocks at home, but can your building blocks make this?”
And she played me this video:
I gaped at her.
“No. My blocks can’t build any structures remotely NEAR that scale. I mean, that is…that is just…the level of precision…the structural stability…so architectural…”, I blustered finally, struggled to find the words to describe what I had seen.
“SOLD!” I gurgled, finally.
Pamela nodded and patted me on the shoulder.
Anyhow, I was completely sold on Citiblocs. I knew that if I showed J and Little E what they could build with these blocks, they would LOVE it.
The Citiblocs are made from Radiata pine wood from a sustainable source in New Zealand and are certified safe and non-toxic. They are sold in different colour combinations – Natural (original pine with no wood stain), Cool (red and yellow tones), Hot (blue and green tones) and Camo (green and brown tones). Pamela was kind enough to give me one box of each colour combination to try out.
Each block is exactly the same size, shape and weight, and the surfaces of the blocks are straight and flat, whilst being textured just enough to increase the friction between the blocks (but not so much that it creates splinters). This precise cut and uniformity of the blocks is what makes them so special After playing with them with my kids, I understand why these blocks have won so many toy industry awards!
This is what happened when I first opened the Citiblocs at home:
A building competition ensues
The Barn Owl, who was recovering on the couch after working through the night, lazily started building a spiral staircase. J started on his own Tower of Babel, with the tower stretching far beyond what we would expect from any of our other building blocks, and Little E even discovered how to make a simple cantilever design.
There was a little booklet inside the boxes filled with pictures and ideas for some basic designs and some more complicated ones – no stepwise instructions needed.
Here’s what the kids were making together during their second session with their Citiblocs:
Building with the power of Physics
Impressive, right? These blocks are really much more fun than my other building blocks and they do encourage kids to be more creative, whilst instilling in them a rudimentary understanding of physics. The more precisely the blocks are placed, the more complex structures can be built – what a way to train fine motor skills! Additionally, since there are no snaps or screws involved, large creations are easily dismantled and put away at the end of the day (as you can tell from our Guide to Citiblocs video below).
And the best part of all this is that they keep my kids quietly occupied for hours. Which is the main point.
I was so excited about these blocks, I decided to buy some more block sets as gifts for my nephews and nieces, as well as a set of CitiBlocs Little Builder Rattle Blocs (for when Thumper is old enough) which won the Oppenheim Platinum Award…after all, Christmas is just round the corner, and My First Games is holding a special Citiblocs promotion!
CitiBlocs sale at My First Games
Just enter the coupon code: CTBTHIRTY at checkout to enjoy 30% off the entire CitiBlocs range at My First Games! (And you get an extra 50 blocks if you spend about $200!) What a bargain!
I am seriously considering getting more Citiblocs to add to our collection so as to challenge J and Little E to build even more complicated structures!
I love Lego. I cannot tell you how much I love Lego. My husband loves Lego. The children love Lego.
I do not love nanoblocks. Nanoblocks are not Lego. They are tiny and evil.
Not long ago, J received some sets of nanoblocks as Christmas and birthday gifts. One of the sets involved building a replica model of a space shuttle, which he was quite enthusiastic about. I let him open it, thinking that it would be just like Lego, only smaller, and therefore more challenging. He was very close to finishing the model when he suddenly stopped, put all the pieces away into a tupperware, and walked away, never to return. The set still remains unfinished.
It’s not like J to leave a project unfinished, so I asked him why he didn’t want to continue. He cryptically answered that working on it was ‘too painful’. He showed no interest in opening one of the other sets of nanoblocks, so I decided that I would try my hand at making a replica of Big Ben, a landmark which holds personal significance to me.
This looks pretty straightforward, I thought to myself, squinting at the nano-sized instructions.
Well, I hadn’t started working on it for more than five minutes before I made my first mistake, and had to painstakingly pry all the pieces off the baseboard with my fingernails and start over.
Nanoblocks, tiny plastic pills of pain
The pieces were so small, that I was terrified that they would spill out of the packet and disappear forever down a crack in the sofa. They were also a real pain, I mean, literally causing me actual physical pain trying to press these tiny bits firmly together. Press too lightly and they wouldn’t clip together. Press too strongly and you risk breaking apart the entire structure. Either way, pressing repeatedly on these tiny blocks was like jabbing myself with the sharp end of a pencil. Again, and again, and again, until my thumb was red and throbbing.
I finally finished the whole structure after working on it for close to two hours.
It is now sitting next to my computer, and it looks pretty good!
Big Ben sitting in state next to J’s Lego tree, my 3M Scotchtape dispenser kitty, and an Ood.
(I still hate nanoblocks, though. Nasty little things)
There is no better way to spend a rainy afternoon than in constructing a fort!
Usually, I just drape a blanket over two chairs but we decided to go bigger this time and make a fort out of newspaper, using the POWER OF MATH!
Basically, I have been observing that the most stable and economical shape used in general construction is a triangle, and a triangulated structure (like the famous Mathematical Bridge in Cambridge) is able to withstand both compressive and stretching forces to maintain its shape.
This concept is quite a simple one to demonstrate in the playground, where many standing structures like swings, slides and climbing frames will consist of beams, ropes or cables fixed together in triangular patterns. Hence, I decided that the best way to demonstrate this principle of geometry and mechanics would be to build an fort using a space frame truss – that is, using triangular units to build a 3-D frame.
What you’ll need:
Newspaper
Tape (I used masking tape)
Stapler
Step One: Rolling, Rolling, Rolling
We started out by rolling up newspapers and stapling them together into triangles. (This is a great way to put idle little hands to good use.) Fold each newspaper sheet into half and roll it up into a stick starting from one corner, so that you only need a tiny piece of masking tape to hold the whole stick together.
To start out with, we made five triangles and taped them together like this:
Step 2: Make a roof
If your kids are pretty small, you can stop there, but we wanted to go BIGGER and BOLDER!
A full igloo!
So we made another 10 triangles and joined them together like this:
Step 3: Complete base of fort
The whole structure turned out to be pretty stable! I covered the whole fort with a flat sheet to give the kids some privacy and they played together quietly in their little igloo for the rest of the afternoon…giving me some time to lie down and have a well-deserved nap on the couch.
(The following post was handed to us on graph paper by guest poster, Droo.)
What follows is both the musings of a man growing up doomed to be an engineer, and a warning for parents on what will doom the little angel to be an engineer.
The two natural traits of a child on the path to becoming an engineer are an unnatural quest to find out “why” and a sense of wonder at how things interact. Consider the following conversation…
If your child asks “why?” and you do not know, work with your child to discover the answer. Use the time to show them how to find out new information, assess the reliability of sources[1] and discover the variety of sources that have interesting facts. As your child grows older, help them to progress from asking “why?” to “why not?” to “how can I do this?” and finally to “how can I do this more than once?” Remember, you can drop a piano out of a second storey window. The trick is being able to do it twice.
Ignorance is Learning!
I am often told that I am very creative. I find this odd, because I do not generate new things. I take lots of small ideas, elements and mechanisms and then assemble them to solve the problem I am looking at. I pick up these small ideas quickly and easily, often by reading widely (but not deeply) and watching large amounts of infotainment. Discussions with fellow engineers on this matter show that I am not alone in this odd way of thinking.
The one toy I find common to most engineers is Lego[2]. As a child, I could build any Lego set from instructions in a day (even the dinosaur model with the Lego Technic control panel set). This constant building and rebuilding encouraged me consider improvements to set designs and make these improvements happen. Lego wasn’t the only toy I had as a child, but almost all of my happy playtime memories involve Lego.
Please note that taking the above actions will not provide a 100% engineering conversion rate. However, they will give your child the skills to find out new facts and explore the world for themselves. Worst case scenario? You will have a brilliant addition to the trivia table[3].
One website I would encourage anyone to visit at any age is Adafruit. There are a lot of interesting projects and lots of good tutorials, amongst other things.
Sub Editor’s Warning: Please note that engineers have terrible spelling and grammar. Handwriting may also resemble spiderlegs squashed against a blackboard. May include addiction to graph paper and interesting new gadgets. Always check washing instructions before use.
[1] No, Wikipedia, useful as it is, is not a reliable source. Neither is the Internet[a].
[2] This is true of both adult engineers and potential engineers.
[a] Becky’s Note: For crying out loud, people who believe that all the world leaders are secretly lizard people from the bowels of the Earth live on the Internet!
Since all my friends were away for the Christmas break on account they have family (or boyfriends) in other countries, I decided to move my Christmas celebration to today!
Thus, I am celebrating the Orthodox Church Christmas, which is usually on or around the 7th of January due to the Greek Orthodox church following the Julian calendar instead of the Gregorian calendar like the rest of us. This is due to a long-standing dispute between the churches that dates back to ancient times and is best summed up by the following video:
To further muddy the waters, we are making a traditional American Thanksgiving Dinner including:
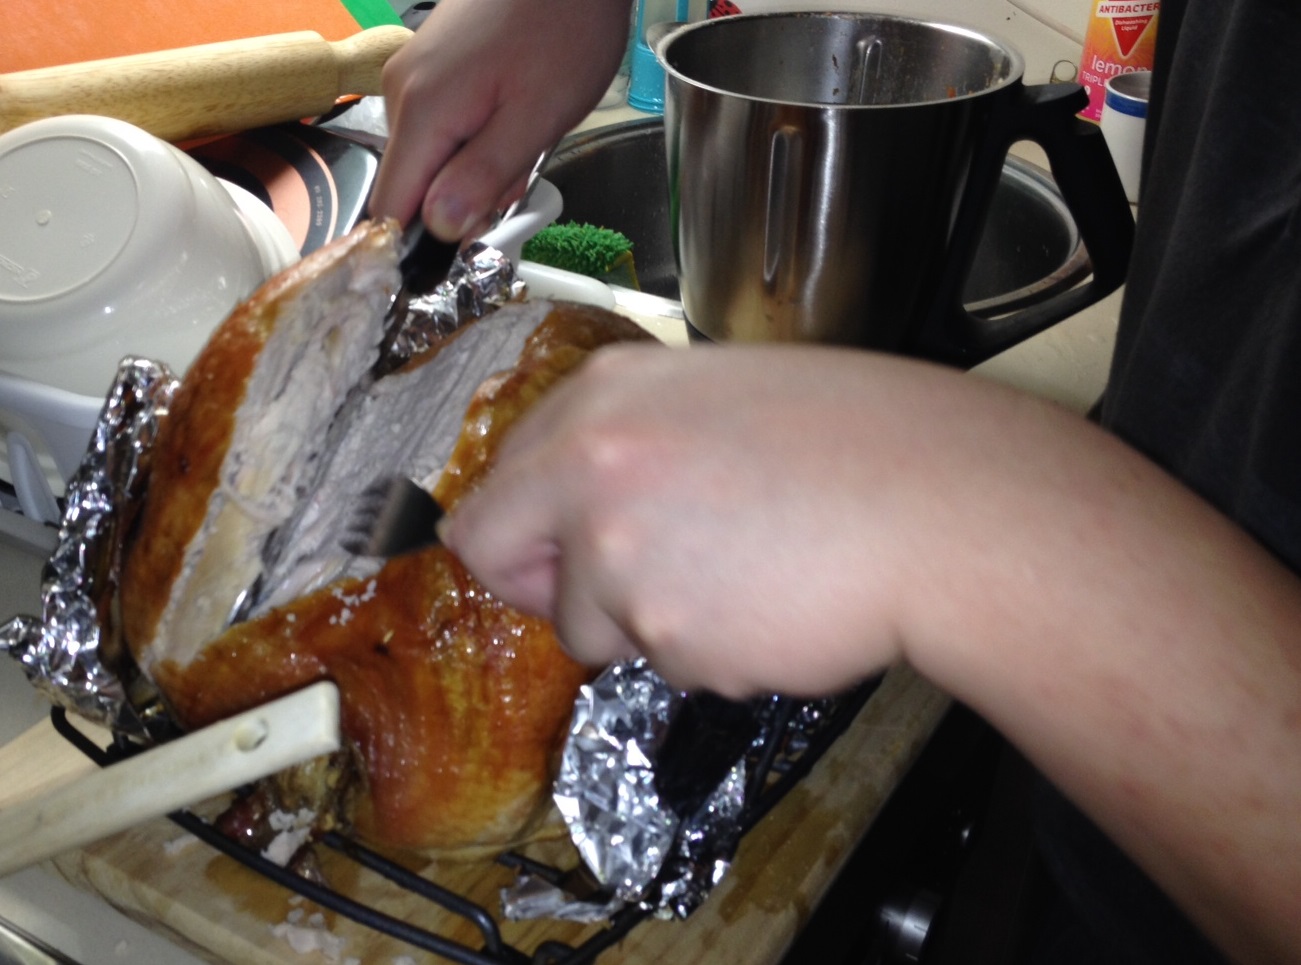
Mangled Turkey carved dysfunctionally
Tai attempted to carve the turkey after watching an online video about how to do it. All things considered, he did a really good job of it.
Rice, chestnut and parsnip stuffing
The stuffing is my mother’s recipe and is made from a mixture of brown and arborio rice, peeled chestnuts and parsnips cooked in chicken stock and white wine, then shoved into the cavity of the turkey and baked.
To make this stuffing, you need:
1 large wok
1/2 cup brown rice
1 cups white rice
125 g of chestnuts
250 g of parsnips
1 cup of chicken stock
1/2 cup of white wine
2 tbsp vegetable oil
First, soak the brown rice for at least 1 hour, then wash and mix it with the white rice. After mixing, dry the rice out slightly and put it in the wok with the vegetable oil. Pearl the rice, then add the parsnips. Mix the white wine and chicken stock together, then put a 1/2 cup of the liquids into the rice in the wok, keep stirring until the liquid is absorbed by the rice. Add the chestnuts, then the remaining liquids, 1/2 a cup at a time until all the liquid has been fully absorbed.
Now, you have two choices. You can either stuff the stuffing into the turkey cavity, or for a stronger turkey flavour throughout, stuff it between the skin and the breast of the turkey.
I made crudtons of the stuffing, so there was a bit too much to put in the turkey, so I cooked the rest in the liquid that came out in the dripping tray (though I saved quite a bit for the gravy as well).
Two types of upside down salads
Coleslaw and garden salad courtesy of Droo, who decided against putting olives in the garden salad for fear of rabid Becky attacks. (I really dislike olives in my salad)
We also had roasted pumpkin, sweet potato pie and a plethora of delicious soft drinks. Unfortunately, due to rapid consumption, I was unable to gather photographs of the remaining foodstuffs. Blame my friends.
Okay, so Droo saw my post on the Lightsaber Bow and decided that it was so very technically incorrect that he needed to write his own to correct my completely inaccurate depictions of his skill and craft. I believe the phrase used was, “Some kind of lightbulb? Some kind of lightbulb?! I’ll have you know that I had very specific lightbulbs in mind!” So, without further ado, Droo’s notes:
I am fascinated with the manipulation of light for the purposes of display and quite often forget that what I see as normal physics is usually never known or seen by most people that do not need to understand the inner workings of the universe. I envy them, because mostly, I have found the only reason to know the inner workings of the universe is because you need to oil the gears turning the crystal spheres.
The design has gone through several iterations, even before I pulled out my notebook to work out which ones would require a Mr Fusion to be strapped to a violin. The “laser bow” is currently in the grey area of engineering, between prospecting for parts and calculating the various requirements to decide which of the two current contenders is less likely to result in personal injury. I have at all times tried to use a continuous light source. Although I love LEDs, I think that this project requires more than a string of dots. The person who is going to enjoy the bow the most is James, so if it breaks the illusion of a light sabre, then the project is a failure.
Castor and his cane. But mostly Castor.
The original idea was similar to the Castor’s light cane from Tron Legacy, made from Perspex. This was doomed to failure from the start, as mentioned by Becky, due to the requirement that it has to be able to play a violin.
The second iteration (and currently under development system) is a regular violin bow, bound with Electroluminescent tape. This is a thin sheet of plastic with a layer of phosphorescent material that is excited to the point of illumination by an alternating electric current. Since it is essentially a long, small capacitor, it can be paired with an inductor to make a tuned resonator, oscillating at the operating frequency of the electroluminescent tape. The major problem is the size of the inductor is in the ball park of 2-16mH, which needs about 500 metres of copper.
A new idea, suggested by Becky, is a fibre optic bundle, finely sanded to emit light. This goes back to the problem of flexing the bow, as there are few adhesives that would last under such circumstances and still hold glass. I have modified the idea and I am now looking for a hollow braid rope, made out of fibre optic plastic. This will allow me to slip a cover over the bow and not need me to worry about individual fibres peeling off. The ideal braid would be similar to the very cheap hobby rope, such as:
Cheap Nylon Braid
This will allow me to go back to the Mk1 version, but allow the bow to flex. It would also allow the colours to change (just in case J pulls a Samuel L Jackson and demands a purple light bow[1]). Currently this version is in the parts prospecting stage, as I am looking for a hollow braid rope, about one and a half metres long, of fibre optic plastic. I may have to make a rope braiding loom and weave one myself[2], but that just means that I can start selling them.
The next challenge will be the electronics on the bow. If I can power the lights, then I can move on and start to do very small scale electronics to control the light source (although the thought of soldering components that are 0.2mm to a side scares me. I can only do down to 0.8mm at the moment)
Becky’s Addendums: [1] J does want a purple bow ala Mace Windu. Purple is his favourite colour. [2] Y’know, I can weave. I own a loom. Just saying.
I see no reason why he shouldn’t have one, so I’ve consulted my friend Droo about the construction of such a bow. Now, Droo isn’t just any engineer. Droo is the engineer. He is descended from a long line of engineers that I’m almost sure dates back to the design and construction of the Pyramids [1].
Droo’s original design for the lightsaber bow involved using some sort of lightbulb cabled to the back of the bow by means unknown to mundane folk like myself. The bulb would be bright and use up very little energy, but the weight of the bow would be far too heavy to J to lift. Plus, we soon discovered that violin bows need to be able to bend, something that such a bulb could not do. The vibrations of the music might also cause the glass to shatter, which would not be safe.
The second design was an idea I came up with. Droo had purchased a roll of lights for sticking up around his house so that he could find his room at night. The lights wouldn’t exactly give a clean, singular light like in the video, but it would have the same effect as fairy lights – besides which, they could also be programmed to blink, or change colours. However, the lights were also fairly energy intensive and needed a large battery pack. We briefly considered using a paper battery as the power source for the thing, but such things haven’t quite hit the common market yet and would blow our budget right out of the water.
Since the bow needs to bend, we’re probably not going to use copper or a string of LEDs, though. Uncle T has suggested finely sanded fibre optic lights, so as not to injure J’s eyes. We’ll make a little bracelet for J to wear when playing his violin that contains the transmitter.
We’re still working on the whole weight/largeness issue. I expect we should be finished with this particular project before J turns six.
[1]Not the Sphinx, of course. The construction of that thing was taken over halfway by shoddy contractors.