Got the Dream!

DEBS DEBS DEBSDEBSDEBSDEBS!  WE GOT THE HOUSE!

The Boobook and I just finished signing the papers for the loan and the exchange of contracts for the house!

WOO HOO!

It’s perfect Debs!  LOOK AT IT!

DSC_0021

The house!  Isn’t it lovely?

IT HAS A GARDEN!

DSC_0020

A slightly overexposed garden.  It’s quite bright in Newcastle.


It’s at the end of the lane so that now the Boobook and I can be called A Becky Lee and the Boobook at the end of the lane!

It’s so cool!

NEWCASTLE, HERE I COME!

PS.  We’re still thinking of what to name the place.  Something that has to do with rabbits, cats or rats would be nice.

PPSS.  Also considering, “Wombotuff House”.

Bonding over colouring pencils

School holidays started a few days early for Little E, but poor weather conditions have kept us all indoors during the morning when J is still in school.

Sometimes I feel like I don’t get a chance to really spend a lot of time alone with Little E in the recent months, as I am either tending to Thumper or helping J revise for his end-of-year tests. However, Little E has been a very supportive sister to her two brothers and just does her own thing, playing nicely by herself. Part of this is because of her own independent nature, but I often feel that she has learned to entertain herself out of necessity.

This morning, Thumper was feeling very tired, so I put him down for a nap early, which meant that I had some extra time. Instead of using this time to catch up on household paperwork, I decided to sit with Little E and do some colouring, which is one of her favourite activities.

I went online and printed out some colouring pages for us to colour together. I decided not to use the usual kids colouring pages that I normally find, but one of the ‘colouring for adults’ pages. Johanna Basford, who started off this adult colouring craze with her book, ‘Secret Garden’, has a few sample pages from her book available as a free printable so I printed those off. (If you like, you can scroll to the bottom of the page for the links).

I personally have never really enjoyed colouring, which I always viewed as a tedious school activity meant to train children to focus and to develop fine motor skills. However, sitting down and colouring with Little E for an hour was a very different experience altogether.

First of all, there is that sense of achievement as you fill a small area with a colour of your choosing. Additionally, as you focus on the simplicity of the action, which is to create something of beauty, it is incredibly relaxing.

One of my friends once told me that having a kid meant that she had an excuse to buy colouring books for herself. At the time, I remember laughing at her quirkiness, but as Little E and I worked on a colouring page together, I began to see how therapeutic it might be. I can now understand why there are colouring books for adults now!

Colouring-with-kids-adults-johanna-basford

Secondly, it was nice to be able to collaborate on a small art project with Little E and it was interesting to see how organic the collaboration became, especially when I didn’t try to dictate her actions or give her any advice or feedback other than ‘That’s really good! I like that!’.

We started out by colouring in separate corners of the page, but after a while, I began to notice how Little E liked to mix colours within a space, and she noticed how I liked to colour in small areas in one colour before changing colour pencils. We then started to copy each other’s style, but adding our own touch to it by varying the colour choices – Little E tended towards high-contrast colour-combinations, whilst I chose complementary colours. By the end of the hour, we were each colouring over the whole page filling in tiny portions that the other might have missed.
secret-garden-free-printable-colouring-kids-adult

Lastly, Little E didn’t stop singing, humming or chatting to me for the entire hour so I learned a lot about the things that she was learning in school, and about her friends in class. She told stories about the owl that we were colouring, and made up a little song about it, and was generally very entertaining. It was so much fun, I am looking forward to our next colouring session together!

In preparation for that, I’ve found a ton of great colouring resources online, which are free to print with permission from the artist! You can even print them out to make your own mini colouring activity book – so great for long plane journeys, waiting rooms and wedding dinners!

Free Printable Colouring Pages (featuring a large number of owl colouring pages of course) just click on the links to download and print:

Secret Garden by Johanna Basford: Page 1 Page 2 Page 3 Page 4 Page 5

Enchanted Forest/Lost Ocean by Johanna Basford: Page 1-3 Page 4 Page 5 Page 6

Animal Kingdom by Millie Marotta: Page 1 Page 2 Page 3 Page 4 Page 5 Page 6 Page 7 Page 8

Steampunk Designs by Marty Noble: Page 1 Page 2 Page 3 Page 4

Words to Live By by Dawn Nicole Designs: Page 1 Page 2 Page 3 Page 4 Page 5 Page 6 Page 7 Bookmarks

Easy Peasy and Fun by Andrea Vucajnk: Page 1 Page 2 Page 3 Page 4 Page 5-6 Page 7 Page 8-9

Made by Joel: Page 1 Page 2 Page 3 Page 4 Page 5 Page 6 Page 7

Rachel Beyer: Page 1-3 Page 4

By the way, many of the independent artists who host free printable colouring pages on their websites are very dependant on views and clickthroughs in order to keep those pages free-to-download on their sites. If you have used and enjoyed any colouring pages from the links above, please do take some time to explore each independent artist’s main page by clicking on their names (underlined in bold).

I promise that you won’t be disappointed – I’ve taken great pains in to find artists who do beautiful work and who share many other family-friendly creative projects on their websites. Not only will you also find more free colouring pages on each site that I have not included in the links above, you’ll also be supporting a starving artist, whilst keeping the colouring pages free-to-download for everybody. That’s three good things for the low, low price of one click!

Becky’s Essence of Fruit (Recipe Inside!)

Recently, supermarkets in Sydney have stopped stocking fruit-flavoured extracts and essences because teenagers have been buying them in bulk and scoffing them to get drunk.

Since I love baking cakes, this has posed a problem for me, since I can’t even get vanilla essence anymore for baking!  The solution?  Make my own flavoured essence, of course!  After consulting with a few friends, and looking up a few references, I was ready to embark on my essence making journey.

Ingredients (berry essence):

  • 250 g berries
  • 250 ml vodka
  • 500 ml glass preserving jars
  • 6 to 8 weeks of time

Becky’s Note: In order to get the best results, I highly recommend using a vodka that’s as close to flavourless as possible.  The more distillation and filtration, the better!  Absolut Vodka is pretty good for this, though I’ve heard that pricier alcohols like Grey Goose and Belvedere are good as well.

Delicious glass and metal soup

Delicious glass and metal soup

Step 1:  Sterilise the Jars

Open the jars, fill them with boiling water, then immerse them and the jar lids in a pot of boiling water and boil for about 15 minutes.  This will get rid of any nasty bacteria that may be hanging around.  The alcohol will take care of the rest.

Make sure that you use tongs when removing the jars from the hot water.

Dump out the water, then use a clean towel to dry the jars and lids up.  Make sure that the jars are completely dry before use.

Cuttin' up the Strawberries

Cuttin’ up the Strawberries

Step 2: Prepare the Fruit

For most berries, I recommend dicing up the fruit so that each piece is roughly 1 cm big.  This will increase the surface area for the alcohol to leech out the berry flavour and juices.

For blueberries, however, don’t bother cutting them up, simply use the tip of your knife to poke a small hole in the skin of each blueberry.

If you’ve got a 500 ml jar, you can just put the berry pieces into the jar and top the jar up with vodka.  However, if you don’t have such a small jar, then make sure to measure the vodka out carefully, as the 1:1 ratio of vodka to fruit is very important.

The essential ingredients!

Becky’s Note: Should you decide to drink some of the vodka at this stage, please be warned that vodka is 40% alcohol by volume.  Make sure to eat something and drink lots of water as well!

Step 3: Put Away for 6 to 8 Weeks

Screw the lids of the bottles on tightly and put the essence bottles away in a cool, dark place for 6 weeks.  Do NOT expose the essence bottles to light if you can help it!  This can really ruin the flavour!

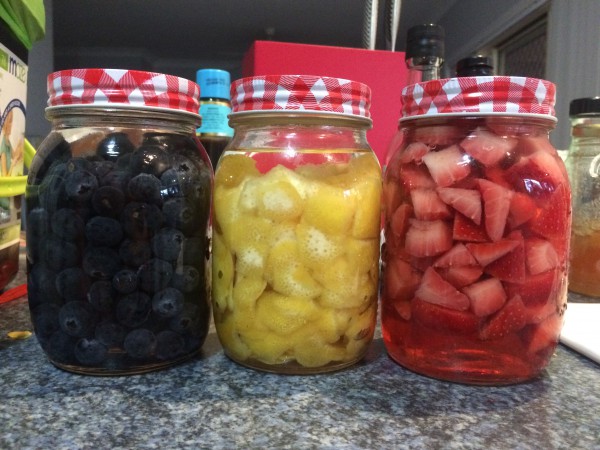
A trio of fruit!

A trio of fruit!

Becky’s Note:  As you can see in this picture, I’ve made lemon essence as well!  Making essence out of citrus fruit entails a whole different process – instead of 250g of fruit, you’ll need the zest of about 1 kg of lemons for every 250 ml of vodka you use.  The resulting jar is therefore less full of liquid, as lemon zest takes up a lot less space and is more potent than the berries.

Over time, the liquor should gain more of the colour of the fruit, while the fruit loses its colour as the flavour is leeched out by the vodka.

Step 4: Filter out the fruit and bottle the essence in smaller jars!

After 8 weeks, take the bottles out and filter the fruit out!  You can now bottle the results up for baking and cooking!

Motherhood Hacks: The 2nd month

Okay, it’s been more than a month since you’ve had a full night’s sleep, and maybe you were getting a little bit of cabin fever after the month long confinement so heading into the 2nd month can be tricky. This is also when people are starting to expect you to have things under control when everything still feels very new. Additionally, the baby is becoming more alert, so not only will baby be slightly more demanding during wake time, but settling him or her to sleep will also be more challenging.

However, here are a few Motherhood Hacks that have helped me to maintain my sanity in the 2nd month!

Motherhood Hack #1: The Look of Love

Babies in their second month are starting to develop their sight and hearing a little bit more, and they can quite easily recognise your voice and your face. After they have been fed, burped and changed, cradle your baby close to you and just…talk.

“Hello Baby, how are you? Are you happy?”

Quite likely, your baby will gaze into your face intently. This focus is so intense that often he or she will stop wiggling around and lie absolutely still for a few moments. Look into your baby’s eyes and see watch the expression on his face change as he listens with rapt wonder at the sound of your voice. Very soon, very, very soon, your baby will start to look for you and smile, just hearing the sound your voice.

Know without question that you are your baby’s entire world. There is not a single human being on the planet that your baby loves more than you.

Memorise this look and remember it during the times when your baby seems to do nothing except cling to you and cry. It will help you maintain perspective.

Thumper meeting his Grandpa for the first time.

Two month old Thumper says: ‘You had me at hello.’

Motherhood Hack #2: The Needs are Not Many

At this stage, most babies have progressed beyond feed-me-seymour cries, their needs are still very basic and their cries usually signify either hunger, tiredness or discomfort (usually a soggy nappy). In other words, nothing that a full tummy, dry nappy and a cuddle can’t resolve.

Rule of thumb for crying – If they’ve just woken up, feed them. If they’ve been up for an hour, cuddle put them to bed. If they smell bad, change their nappy.

Motherhood Hack #3: Get your hood on

Babies at these stage are amused by very, very little. I mean, they will stare at their little hands for long moments, frowning as if to ask, ‘What are these two lumps doing in front of my face?’

This also means that the stream of visual stimuli provided by just being in the world will make babies mentally fatigued after a while, so if you need to calm them down or settle them for a nap, put them in a dark room. Failing that, literally pulling the wool over their eyes will do the trick. I always carry a large muslin cloth with me when I go out and if Thumper gets tired, I just drape it over his head and he goes out like a light. Works for birds of prey, works for two month old babies.

Motherhood Hack #4: Make like a kangaroo and hop on out

Two month olds are not mobile at all, they have no coordination to speak of, and they still sleep most of the day. This means that this is actually one of the best times to get out and about because your baby will be happy to sit quietly in a sling and doze off against your chest whilst you get a well deserved reflexology massage or a pedicure. So go on and pamper yourself!

Motherhood Hack #5: Take five

Sometimes you might feel like you can’t leave your baby’s side, not even for a minute. But at two months old, your baby physically cannot go anywhere. So if you need to take a few minutes to go to the bathroom, make a cup of tea, have a shower or just sit in a different room until your ears stop ringing, then put your baby down in a safe place (like in their cot), then go ahead and take five minutes to yourself. Your baby cannot get into much trouble whilst you are away, and those few minutes away from him or her will refresh your mind and energy stores!


It’s Getting Hot in Here (Recipes for Cool Drinks)

It is HOT in Sydney.  As in, it’s egg cooking into the pavement melt into a puddle HOT.  It’s so hot, in fact, that nobody is allowed to go visit the National Parks in case they, y’know, CATCH FIRE.

41oC is HOT.

It’s this kind of weather that makes me want to reach for a glass of ice cold water, but drinking plain cold water on a hot day isn’t always the most comfortable and I’m not a big fan of fizzy drinks, no matter how chilled[1].

So, I’m taking a leaf from Little House in the Prairie and our Auntie G from Alabama, and making me some good ol’ fashioned American Deep South cold drinks for the fridge.

Now, most American recipes tend to be a lot sweeter than we like, so I’ve modified them a little to reduce the amount of sugar.  Still, if you prefer a sweeter drink, feel free to sweeten the pot, so to speak!

Auntie G’s Sweet Iced Tea

  • 1 small pinch of baking soda (optional)
  • 75-170g sugar
  • 1 l boiling water
  • 1 l ice cold water
  • 4 – 6 teaspoons of tea leaves
  • A large jug
  • A fridge

FullSizeRender (4)

Minty Fresh!


Put a pinch of baking soda at the bottom of the carafe used to store the tea, then pour 750 ml of boiling water into the carafe and steep the tea leaves in it.  I highly recommend steeping the tea for as long as it takes to cool down to room temperature

Becky’s Note: The pinch of baking soda is really mostly recommended for black or green tea brews.  The tannins in black and green tea tend to become more stringent tasting when cooled, so adding a little bit of baking soda helps smooth the taste.  This is optional for red teas and is NOT recommended for white teas.

Dissolve the sugar in the remaining 250 ml of boiling water.

Becky’s Note: The amount of sugar used should be reflective both of how sweet you want the tea, but also the kind of tea you used.  If you’re using a black tea, you’ll want to add more sugar to counteract the bitterness.  If you’re using a red or white tea, less sugar is advised or the sweetness will overcome the natural taste of the tea.

I used Red Choc Mint tea from T2, as the minty flavour adds a little extra cooling to a hot day.  The jug I used is also from T2, and is a specialty jug for making iced tea in.  You can use a regular carafe or even a tea pot for this stage, of course, just make sure to put the tea leaves in a strainer for easy removal later!

When the tea is fully steeped, remove the leaves, add the sugar syrup and stir.  Then, add the cold water and bung the jug in the fridge.  Leave for at least 1 hour, then enjoy!

Little House on the Prairie Ginger Water

  • 1 cup brown sugar
  • 2 tsp powdered ginger
  • 1 cup apple cider vinegar
  • 1.5 litres of cold water

IMG_20151119_203210 (1)

A glass of Ginger Water after a long day goes a long way!


Mix the sugar, ginger and apple cider vinegar and heat until the sugar is dissolved.

Becky’s Note:  Honey can be substituted for brown sugar in this recipe and the results taste equally as delicious, though slightly tangier.

Pour the sugar syrup into a carafe and fill with cold water.  Put in fridge for at least 1 hour.

Serve over ice and enjoy!


[1] I will make an exception here for Bundaberg’s Peach drink, which is absolutely heavenly.  I’ve always liked Peach Soda though, as it was one of the first things I ever bought with my very first paycheck.

Great Smoky Mountain Cool: Family Friendly Activities II

It’s Travel Thursday and we are continuing our Great Smoky Mountain Cool series over at Owl Fly Away!

Owl Fly Away

It was a lovely, dry morning, just perfect for a walk in the woods. We were pretty tired out from the previous day’s long drive, so we decided to do an easy hike.

We started out at the Elkmont Nature Trail, but after about 30 minutes in, we came across a large muddy scree, so instead of tiptoeing through it, we decided to cut our losses and head for the Little River Trail instead.

The Little River Trail and the Elkmont Campgrounds Along the Little River Trail and the Elkmont Nature Trail

The Little River Trail is quite near the Elkmont campsite, and runs alongside a fast flowing river. The path itself used to be a gravel railroad bed, so it is very wide and level

The area was so idyllic, it was unsurprising to find out that it was a popular holiday destination for the Knoxville hoi polloi in the 1920s. The holiday cottages are still standing derelict along the…

View original post 329 more words

Midweek Break: Round them up with Stickerkid

If you saw my post earlier this week, you will have read about how important it is to label every single thing that your kid intends to bring to school – especially if he or she is starting school for the first time. Or maybe you have an absent minded new BIL who might just lose his bento box at work.

Well, here to cheer you up and out of those midweek blues is Stickerkid with a very special something for Owls Well Readers:

Stickerkid is very kindly sponsoring a giveaway of ONE set of round stickers for one lucky Owls Well reader! Hooray! Each sticker can be personalised and the round labels have space for two lines of text, so you can use them as name labels, return address labels, even gift tags! 

To take part in this giveaway, just complete the following:

  1. Be a fan of the Owls Well Facebook Page
  2. Share this giveaway on your Facebook Page (set to public), tagging @Owls Well as well as at least three friends
  3. Visit this post and leave a comment there telling me about your favourite item from the Stickerkid webstore. Don’t forget to tell me the name of your Facebook account that you used to share this giveaway and include your email address! (If you would like to send me the email address privately, leave a comment for the other answers, then email me at 4owlswell [at] gmail [dot] com)

(Giveaway is open worldwide and will end on 30th November 2015. Winners will be picked via Random.org – just make sure you complete all 3 easy steps!)

P.S. Don’t forget that Owls Well Readers are entitled to a whopping 10% off any Stickerkid order! Just enter the code “SG10STICKERKI9_C7” at checkout! (Code is valid until 31st December 2015.) 

Update: This giveaway is now closed. Jaime is our winner! Congrats!

Beginner’s Guide to Starting School: Label Your Stuff

Some of you may have figured out that J started Primary School this year, and I have to say that I was woefully underprepared for it. I mean, I figured that it would not be much different from attending preschool. How wrong I was.

First of all, I never realised how important it was to label everything. And I mean, everything. Not just the books and the big items like the water bottle and pencil case, but also every single piece of stationery, down to the last colour pencil and crayon.

Fortunately for me, J’s Godmother is a much wiser person than I am and for Christmas last year, she gave J a whole set of very beautiful, personalised name labels that she had specially ordered all the way from the USA.

Best.

Gift.

Ever.

These name stickers were a real lifesaver, and without them I probably I would have spent a fortune on stationary this year! It is amazing the number of times J has come home with stationary missing from his pencil case or with somebody else’s book that he accidentally stuffed into his schoolbag at the end of the day.

There are quite a few online stores where you can get good quality name stickers, but most of them are quite pricey. I have recently had the opportunity to test out the name labels from Stickerkid which are surprisingly affordable, being the best value that I have seen on the market, while having the greatest flexibility in customisation and the quickest turnaround time, making them a great last minute gift idea!

Owls Well Recommends: Get the ‘My First Classes’ pack which is not only great value but includes a ton of small stickers for all the tiny stationary, big stickers for larger items, shoe stickers as well as clothing labels! Enough to label every single thing for that first year in school.

pack_m_-_new_1

Label everything. EVERYTHING. (Picture Credit: Stickerkid.sg)

Like most name labels on the market, Stickerkid labels are washable (in both the washing machine and the dishwasher) and last well through extreme temperatures (being microwave-safe and freezer-safe), and they also adhere to every surface (except Teflon. Nothing is supposed to adhere to Teflon, that’s why it’s called a ‘non-stick surface’). They also come in a range of colours, fonts and there is a huge range of cute clipart designs that you can add to personalise the stickers further.

However, here’s what I particularly like about Stickerkid name labels which makes them different from the rest:

  1. If you can type it in, you can print it. Most of the other name labels that I have tried are limited to a fixed number of characters and can only print letters. However, when customising the Stickerkid labels, I could change the size of the font so that even the smallest name label could accommodate my son’s full name as well as his 3-character chinese name. I even tested the customisation fields, cutting and pasting words in other languages like arabic, hindi and thai, and they all worked too.
  2. Iron-on Clothing labels and Shoe Labels can fit more than one line of text. This means that you can also put important information there like emergency contact details or even allergy alerts. Or you can label the shoes for kids who have not yet learned left from right!
  3. Removable Iron-on Clothing labels. The clothing labels can withstand repeated hot washes yet are removable with a hot iron. So if you need to give the clothing away or hand them to your next child, the labels can be easily removed.
  4. Swiss pride. The Swiss manufacturers of Stickerkid labels are so proud of their high-quality products, that there is a 10 year guarantee on their name labels. So they’ll last all the way through their whole primary (maybe even secondary) school journey! Even the clothing labels are guaranteed to withstand at least 45 machine washes at 60 degrees Celsius.
  5. Superfast turnaround time. Although the stickers ship from Switzerland, they are shipped within 24hours and arrive by priority post within a week. The trial pack that I received from StickerKid actually arrived at my doorstep in FOUR DAYS. This is impressive, considering that other name label companies take around 2-4 weeks. This makes it a great last-minute gift! Trust me, your friends with kids will thank you for it.

A Special for Owls Well Readers: The fine folk behind Stickerkid are offering Owls Well Readers a generous 10% storewide discount!  Just enter the code “SG10STICKERKI9_C7” at checkout! (Code is valid until 31st December 2015.) 

Make the Dream

Gosh, Meimei, your house hunting seems like it has been rather a struggle! When the Barn Owl and I first got to Singapore, I did a little bit of house hunting on my own, as we were thinking of buying a resale HDB flat.

Well, it’s amazing the sort of homes exist and how much tastes vary across generations and cultures. I viewed one flat that seemed to be a mega-fengshui place, complete with translucent jade-effect tiles with the occasional mother-of-pearl inlay with gilded details and a large reflexology pebble path spiralling across the floor. It had gorgeous views over the Chinese Gardens.

I saw another flat that turned their bomb shelter (yes, Singapore flats all come with inbuilt bomb shelters for the impending apocalypse) into a shrine to Ganesh, and they were so devout that even the floor tiles had Ganesh’s likeness inscribed on it.

Yet another flat decided to embrace the industrial nature of the early flat designs, before the BTO “choose your own floor tiles” flats came into being. It was all unpainted cement floors and walls, bare light bulbs and Ducts, Ducts, Ducts.

Do your ducts seem old-fashioned and out of date?

Do your ducts seem old-fashioned and out of date?

I am really thankful for the flat that we are staying in now, with the large windows looking out into the trees, letting in lots of light. We did not need to do any renovations to it, just got our own furniture. It’s by no means perfect, and it’s not really the dream house that the Barn Owl and I had in mind when we first got married but we have been here for 6 years, which is the longest continuous length of time that I have ever lived in one place, in one house.

This house has seen us grow our family from one to three little ones. It’s seen the Barn Owl as he struggled to balance work, study and new fatherhood until he finally passed his postgraduate exams. It’s seen me on sleepless nights with pregnancy-induced insomnia, baby-induced insomnia and first-day-of-school insomnia.

We may not have found our dream house, but we’ve made our dream home here, and you’ll find yours too soon.

Great Smoky Mountain Cool: From Tennessee to North Carolina to the North Pole

It’s Travel Thursdays over at Owl Fly Away, in which we figure out how to get from Tennessee to the North Pole in a day.

Owl Fly Away

We got up very early in the morning and headed straight to the car, because the Aged Ps had booked a surprise adventure on the Great Smoky Mountain Railroad, not realising that the Railroad was located on the other side of the Great Smoky Mountains National Park from where we were staying in Pigeon Forge, Tennessee.

But no mind, the drive across to the North Carolina side of the National Park actually took us through some of the most amazing mountain landscapes, and we made plenty of stops at various lookout points along the road to stretch our legs and enjoy the view.

Panoramic views of the Smokies from various lookout points Panoramic views of the Smokies from various lookout points

One of the longer pitstops we made was at Newfound Gap, which is the lowest drivable pass through the Smoky Mountains, making crossing the mountains so much easier for travellers. Even in the most heavy snowfall, the Newfound…

View original post 934 more words