When we were preparing for our first child, we honestly had very little idea of what we needed. We were highly dependant on recommendations from magazines and mothering forums, all of which listed hundreds of baby items that were deemed essential for basic survival. So, we researched and consulted the Oracle of Google and researched some more, and in the end we made lots of good investment buys, but also lots of poor choices which we regretted spending large sums of money on.
I remember wishing that there was someone who would have warned me before I put down money on an expensive baby “necessity” that only saw the light of day two or three times!
Anyway, for what it’s worth, here are:
The 10 best baby purchases that we have ever made (and a few of the worst)
By the way, this list does not include safety equipment like carseats – safety equipment is a NON-OPTIONAL purchase!
1. Travel cot/playpen
The only drawback of the travel cot is that it is not very pretty to look at. However, the cot has become very lovely to us by virtue of the fact that it has been indispensable!
The travel cot that we purchased cost less than SGD$150 and comes with a bassinet, a changing table that can be perched on top of the cot, as well as a detachable toy bar. It has two wheels to make it easy to move around, and the whole thing folds up umbrella-wise and can be stuffed into a carrier for transport.
We love this cot because it is not only very sturdy and can be used until a child is ready to transit to a proper bed, but it is also multifunctional (so we saved a bundle on nursery room furniture). We brought this cot with us whenever we went abroad because we found that having a familiar sleeping area really helps to settle a small child in a strange new place.
We also found that the mesh sides of the cot were really wonderful when babies start rolling and crawling around – because we did not have to worry about them bumping their heads or getting limbs caught in the cotsides. No need at all for fussy cot bumpers!
(The travel cot we own is from Chicco and we bought it from Mothercare during a clearance sale. Most of the travel cots I’ve seen are pretty similar in function, so it’s a matter of deciding on a cot based on the accessories and what colour you like.)
WORST BUY #1: The expensive solid wood cot-bed that looked so gorgeous but turned out to be so useless. It cost nearly 10 times that of the travel cot and it has been a terrible investment. We had grand ideas of using it as a toddler bed and then as a day bed, but it has since been dismantled because it was taking up so much space in the house and anyway, the babies hated sleeping in it cos they kept knocking into the sides. We have not even got it out for Baby #3!
2. Baby sarong sling
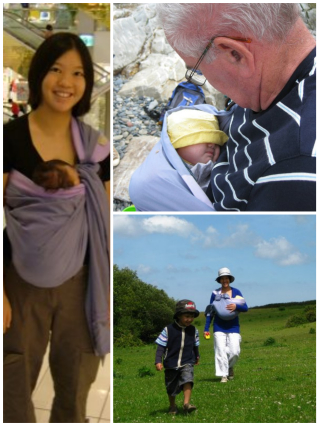
J and Little E in the sarong ring sling
If you’re looking for a great gift for an expectant mom that will come in useful from birth, I highly recommend this inexpensive option!
The sarong sling is really useful for babywearing from birth and can be used all the way until the child is 3 years old (or 18kg, whichever is first), and it’s one size fits all, so it fits not only petite frames like mine, but can be used by giants like the Barn Owl (and the Barn Owl’s dad, as you can see from the picture!). It is also pretty to look at, super lightweight, packs well into a diaperbag and is comfortable to wear in warm, humid climates.
Additionally, the sling is wonderful for breastfeeding on the go, or for use as a nursing shawl. It can also double up as a blanket or sunshade in the car or pram. At around SGD$50-60, it is much cheaper than a structured baby carrier as well!
(The sarong ring sling that we own was a baby shower gift from a dear friend and was made by Moms In Mind – which has since been rebranded ‘The Birth Shop’. Ours is the cotton sateen model.)
3. Structured baby carrier

Little E in the baby carrier
Although the sarong sling is meant to be used until a child reaches around 18kg, I found it much more comfortable to use a structured baby carrier once the babies got too heavy to carry with all their weight on one shoulder.
A structured baby carrier is usually designed to distribute a child’s weight across the parent’s shoulders and hips, so that the parent can comfortably carry more weight and maintain a good posture at the same time. It is comfortable for the child too because they are in a sitting position with a nice straight back, and both J and Little E would take long naps in the carrier.
Although it is much bulkier and warmer to wear than a sarong sling, the baby carrier is really useful for getting about solo in the city and for travelling. It’s so great for fussy little ones on aeroplanes who just want to be carried! We also brought it along with us during holidays where we were doing lots of hiking and walking.
We used the carrier until J was about 3 years old, by which time Little E was big enough to use it – she used it for 3 years as well, and now I’m getting it out again for Baby #3!
(The baby carrier we own is the Ergobaby Original, which we bought during a sale at Metro. It’s quite pricey, so if you’re planning to get one, do shop around the online websites to get the best deal! Since then, I’ve been told that the latest models are much less bulky and are made from much more lightweight and breathable materials.)
4. Umbrella stroller
As you can tell from #2 and #3 on this list, we tend towards babywearing when getting out and about, instead of placing the babies in strollers and prams. This is because we made a very poor decision early on to buy a very beautiful, very expensive convertible, reversible stroller. Which brings us to…
Worst Buy #2: The very fancy-looking, very expensive Convertible Pram-Stroller that was apple red in colour but turned out to be a white elephant. We bought it because we thought it would be suitable from birth until 6 years old and because it could be adjusted to lay completely flat for naps-on-the-go. However, like all convertible stroller systems, it is large and bulky. In fact, it was so big that it took up most of the space in the car boot. Even though it could be folded up one-handed, it proved to be a hindrance as it just became a huge weight that I would have to lug with one arm (the other being full of baby and baby bags) when going up escalators or getting onto the public bus. It was really heavy so pushing it around was actually more tiring than just carrying a baby in a sling. Additionally, the lay-flat pram function of the stroller turned out to be not very useful as our babies preferred to be carried so that they could look at their surroundings instead of staring straight up at the sky. In the end, the pram became more of a glorified shopping trolley when we went out. We actually gave up using it. We gave it away before Little E was born.

A tired J and Little E sharing a stroller
We did get a super-cheap (it cost less than SGD$80), super-lightweight umbrella stroller which we really do love.
The umbrella stroller can only really be used from when a child is able to sit up unsupported (so from around 5-6 months of age), but that worked well for us because we were baby wearing during the early months anyway.
The umbrella stroller was so much smaller and easier to travel with, so we took it on holiday with us, and if it needed to be folded, it was light enough to hang on the crook of my arm like, well, like an umbrella. It can also be dragged around in its folded position. It is so streamlined so it is easy to get the pram into tight spaces (like crowded restaurants, for example).
The only drawback of the umbrella stroller is that it is so lightweight that if you take your child out of it when you still have a heavy diaper bag resting on the handles, the stroller might tip over. The seat can be reclined but it doesn’t lay flat – that won’t stop the kids from taking a nap in the stroller when they are tired!
If you’re looking for an umbrella stroller, make sure that it can be folded one-handed and is easy to carry or drag with one hand. Also try to ensure that it has a place for you to hang your bag as well as a place for you to put your baby carrier or sling (in case you have to carry your child and fold up your stroller, at least with a sling/carrier you have both hands free!)
(Our umbrella stroller is a Maclaren Daytripper which we bought during a Takashimaya baby fair. I think this model has been discontinued and has since been replaced with the Maclaren Volo which is even lighter.)
5. Convertible highchair

Picture Credit: Svan
If you have not already noticed, our worst buys so far have been purchases intended to ‘grow with the child’. This rule does not apply to the convertible highchair!
We love our convertible highchair because it is not only beautifully made from solid wood and fits in well with the decor of our home, but it is slim so it takes up little room in the house (unlike the bulky plastic highchairs that have such a large footprint).
Yes, it is very pricey, but I feel that we have gotten more than our money’s worth out of it. We used it for both J and Little E from when they started sitting up with us at the dining table, adjusting the seat to the right height, until they were big enough to sit in regular dining chairs without needed a boost. Now that the kids aren’t using the chair, I’m currently using it as my computer desk chair – although very soon I’ll have to convert it back to a highchair for Baby #3!
(Our highchair is the Svan Convertible High Chair which we bought from a now defunct store selling ergonomic furniture for children. We also have a Pali Pappy chair which we acquired secondhand off Craigslist.)
Mummy Tip: Craigslist and Gumtree are a great places to find all sorts of preloved baby things in good as new condition! Save money + Recycling = Doubleplusgood!
6. Cloth nappies/diapers
I can never say enough good things about our cloth nappies. They are rather a large investment as cloth diapers cost about SGD$30 apiece at the start, but they have eventually paid for themselves over the last 7 years of use!
(I could continue to wax lyrical about them but you can read more about our cloth nappy stash here.)
7. Large muslin swaddle blankets

Little E all wrapped up
These lovely, light, 100% cotton muslin cloths are wonderful and inexpensive – and they are so versatile!
I always carry one or two of these in my diaper bag when we go out because they are so handy. The best thing about them is they are thin and superfine which makes them easy to launder – if they ever get soiled, you can wash and dry them, and they’ll be ready to go in an hour or two!
Muslin swaddles come in many different sizes (Malaysian brand Anakku makes a very basic white 10pack of ‘cloth napkins’ which are 76 x 76cm and I’ve seen them sold for under SGD$30 at Fairprice), but my personal preference is for very large muslin cloths measuring at least 100 x 100cm with pretty prints or embroidery!
Here is a brief list of what I have used my muslin swaddles for:
- Swaddling baby (of course)
- Blanket
- Nursing cover for discreet breastfeeding
- Sunshade for the stroller or carseat
- Liner for changing mats
- Cot sheet
- Play mat
- Burp cloth
- Towel
- Emergency clean up cloth for spills and other thrills
- Scarf (for myself)
- Play tent…..the list is really endless
(I have a mixture of muslin swaddles that were all gifts from the Aged Ps who purchased them during a trip to Australia. Most of them were purchased from Pumpkin Patch.)
8. Wet bag

Little E loves her wet bag
I first purchased a wet bag to accompany my collection of cloth nappies – I mean, I needed a good place to put soiled nappies (or clothes) when we were out and about.
Wet bags are not only good for keeping wet and messy items (like soiled clothing or nappies) separated from the rest of the contents of the diaper bag, but they keep nasty smells in very well too. If they ever got dirty, I just chucked them in the washing machine and they would launder up good as new.
Once my kids were out of nappies, the wet bags became laundry bags, luggage organisers, swim bags, picnic sacks, and reusable shopping totes (they are especially good for corralling items that collect a lot of condensation).
(The wet bags I have are from Planetwise, Monkey Foot and SnuggyBaby. I purchased the Planetwise wet/dry bag from Milagro Trading, and the Monkey Foot and SnuggyBaby wet bags were given to me by JED Packs for a product review.)
9. The ‘not-a-diaperbag’ diaper bag
I have found that diaper bags or ‘baby bags’ are highly overrated and tend to be overpriced. As far as I can tell, good quality diaper bags or baby bags have the following features:
- they are big
- lots of exterior pockets, usually zippered or magnetic closures
- no noisy velcro
- rip-proof fabric that wipes clean
- extra special straps for hanging on stroller handles
- changing pad
- insulated pockets for bottles/food
Apart from the changing pad and the insulated food/bottle holders, which are easily purchased separately, a diaper bag is essentially a glorified overnight bag with bells-and-whistles and a hefty price tag.
So, instead of a purpose-built diaper-bag, I bought a roomy, washable bag in the ‘Medium Weekender‘ style from LeSportsac during the end-of-season sale at Isetan that had lots of zippers and pockets. It was a fraction of the price of the Le Sportsac baby bag, and I still use it as a carry-on luggage bag when we go travelling.
10. Plastic washing up basin

Cheap as chips
A simple plastic washing up tub, available for less than SGD$10 at any neighbourhood hardware store, makes a decent little baby bathtub.
Seriously.
You can fit a tiny infant in there to start with until they are big enough to sit up in it.
Thereafter, it can be used for water play in the shower or in the big bathtub.
I prefer it because it is small enough so that it can be filled up using the bathroom sink which saves me the trouble of having to carry it from the shower to the bathroom countertop. Even when it is filled with water, it is light enough to carry around without breaking one’s back. Additionally, it is too small to completely submerge a child so I feel that the risk of drowning is much less.
This leads me to…
Worst Buy #3: A purpose-built Baby Bathtub This was a roomy SGD$80 Fisher-Price baby bathtub that came with a cushiony sling to support newborns. It was HUGE. And when it was filled with water, it was HEAVY. We actually bought the small plastic basin and used it to fill up the larger baby bathtub. Yes, the kids loved splashing around in the baby bathtub, but really, we eventually just started using the small basin as a bathtub, because it saved on water and was easier to use.


